OpenThread Node - nRF52840 DK Follow-Along Guide
This follow-along guide shows how to build your own OpenThread Demo using widely available off-the-shelf development boards from our partners. We call this Follow-Along Hardware, and we think it's one of the quickest and easiest ways to get started building an IoT proof-of-concept with Golioth.
You will learn more about Thread networks, flash a pre-built firmware image onto the device, and connect to the network and Golioth cloud in minutes. We also provide instructions on how to build it yourself if you want to make changes for your specific application.
Thread Node Hardware
Now that we have set up the Border Router in the previous step, we want to build a Thread node that will begin communicating to the wider internet using the Border Router. The node will be built using Zephyr and will have the OpenThread stack compiled into it. Golioth has a starter project on GitHub that will be used throughout this section. This has all of the Golioth required elements to get a node connected to the Golioth Cloud and transmit data back and forth. This code also includes a shell to interact directly with your device and program in credentials for both connecting to the Border Router and validating onto the Golioth network.
The Follow-Along Guide is based on the nRF5280 DK:
Flash the firmware
The firmware source code and pre-built firmware images for this reference design are available on GitHub under a permissive Apache-2.0 license.
The OpenThread Demo firmware is based on the Golioth Reference Design Template. Changes from the upstream template are periodically pulled into new releases of this firmware. Check out the firmware CHANGELOG for a detailed list of changes included in each release.
Flash the pre-built firmware image
We recommend getting started by flashing the latest pre-built release firmware image. These release images have been tested by the Golioth team and are the quickest way to verify that the hardware is working correctly.
Step 1 - Download the pre-built firmware image
Download the latest golioth-openthread-demo_vX.X.X_nrf52840dk_nrf52840_full.hex firmware image file from:
Step 2 - Install nRF Connect for Desktop
We recommend using the nRF Connect for Desktop application to flash the pre-built firmware image to the board.
You can download the latest version for Windows, Mac, and Linux from the Nordic website (make sure to choose your operating system from the dropdown):
Step 3 - Flash firmware with the Programmer app
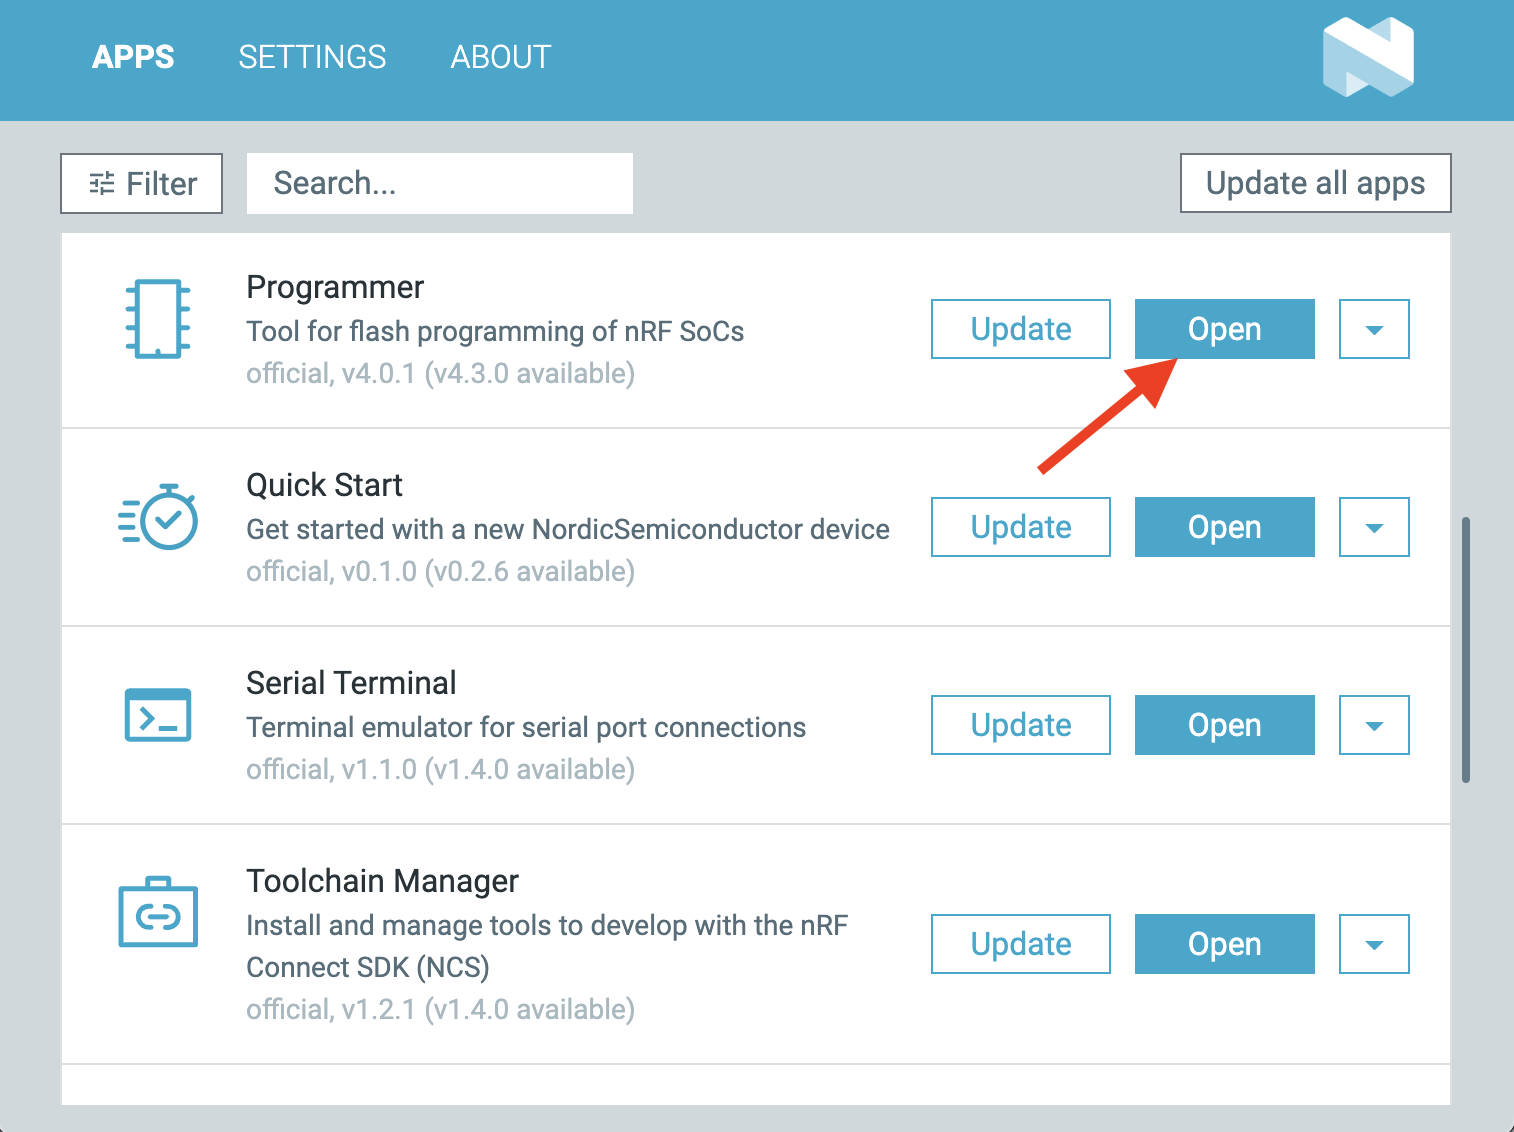
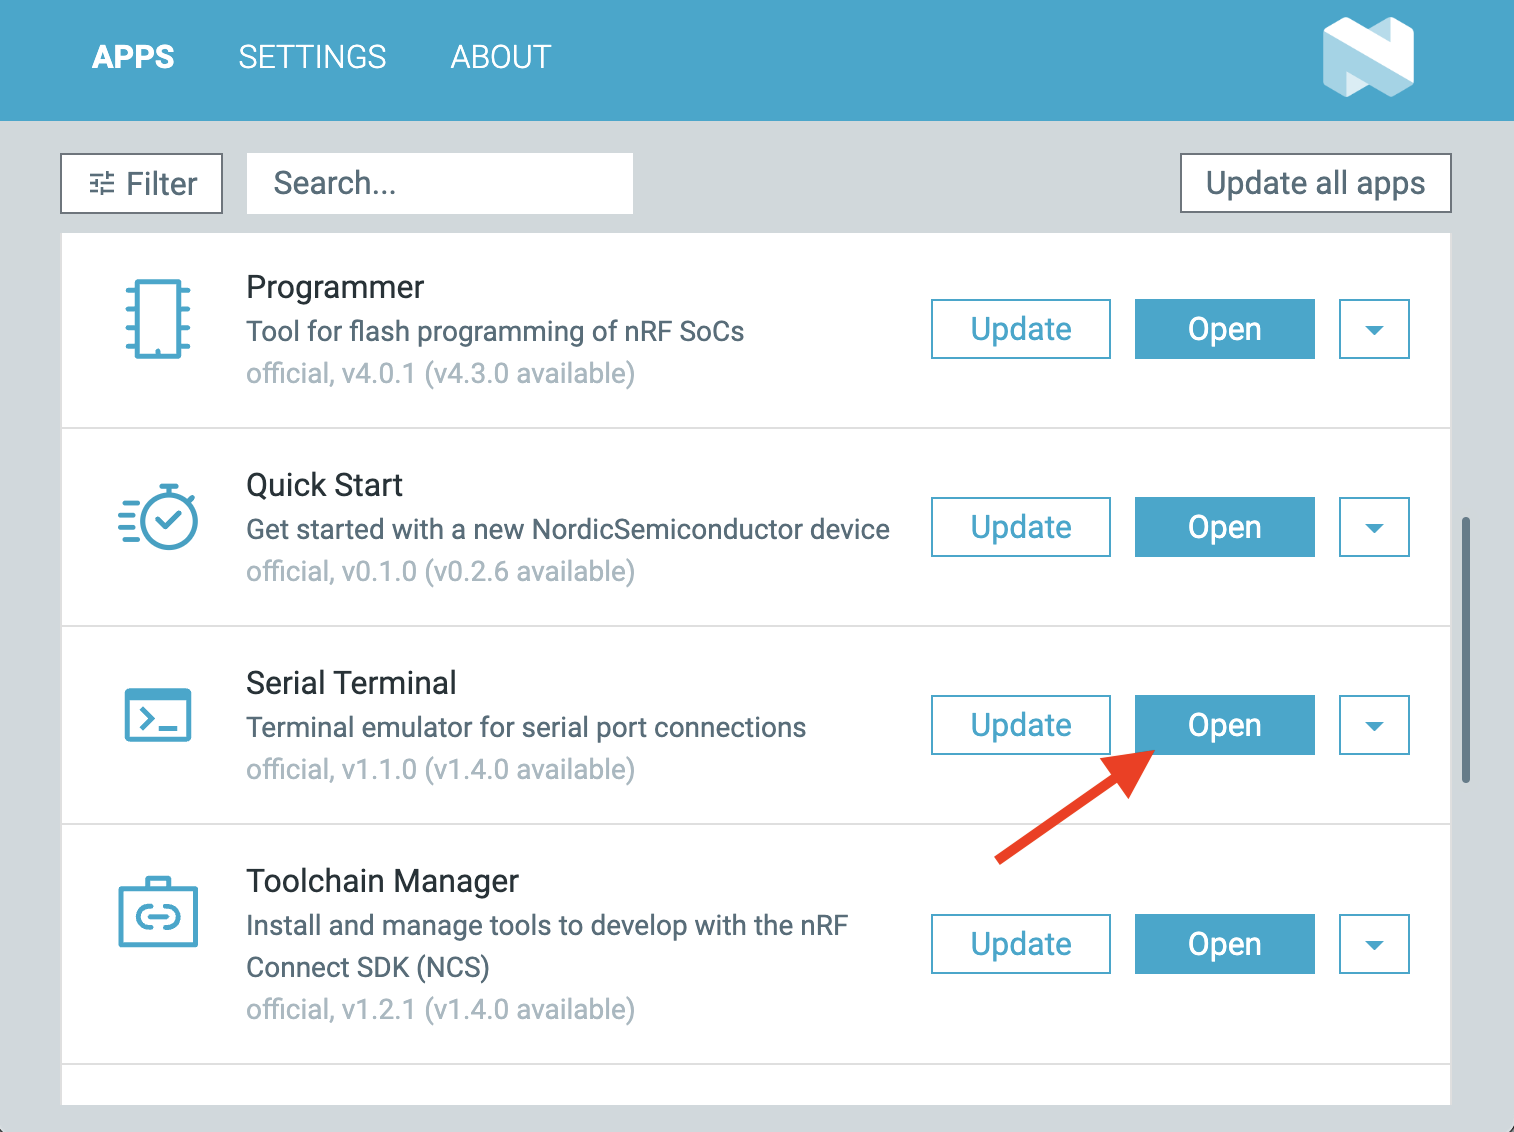
After installing nRF Connect for Desktop, open the Programmer app:
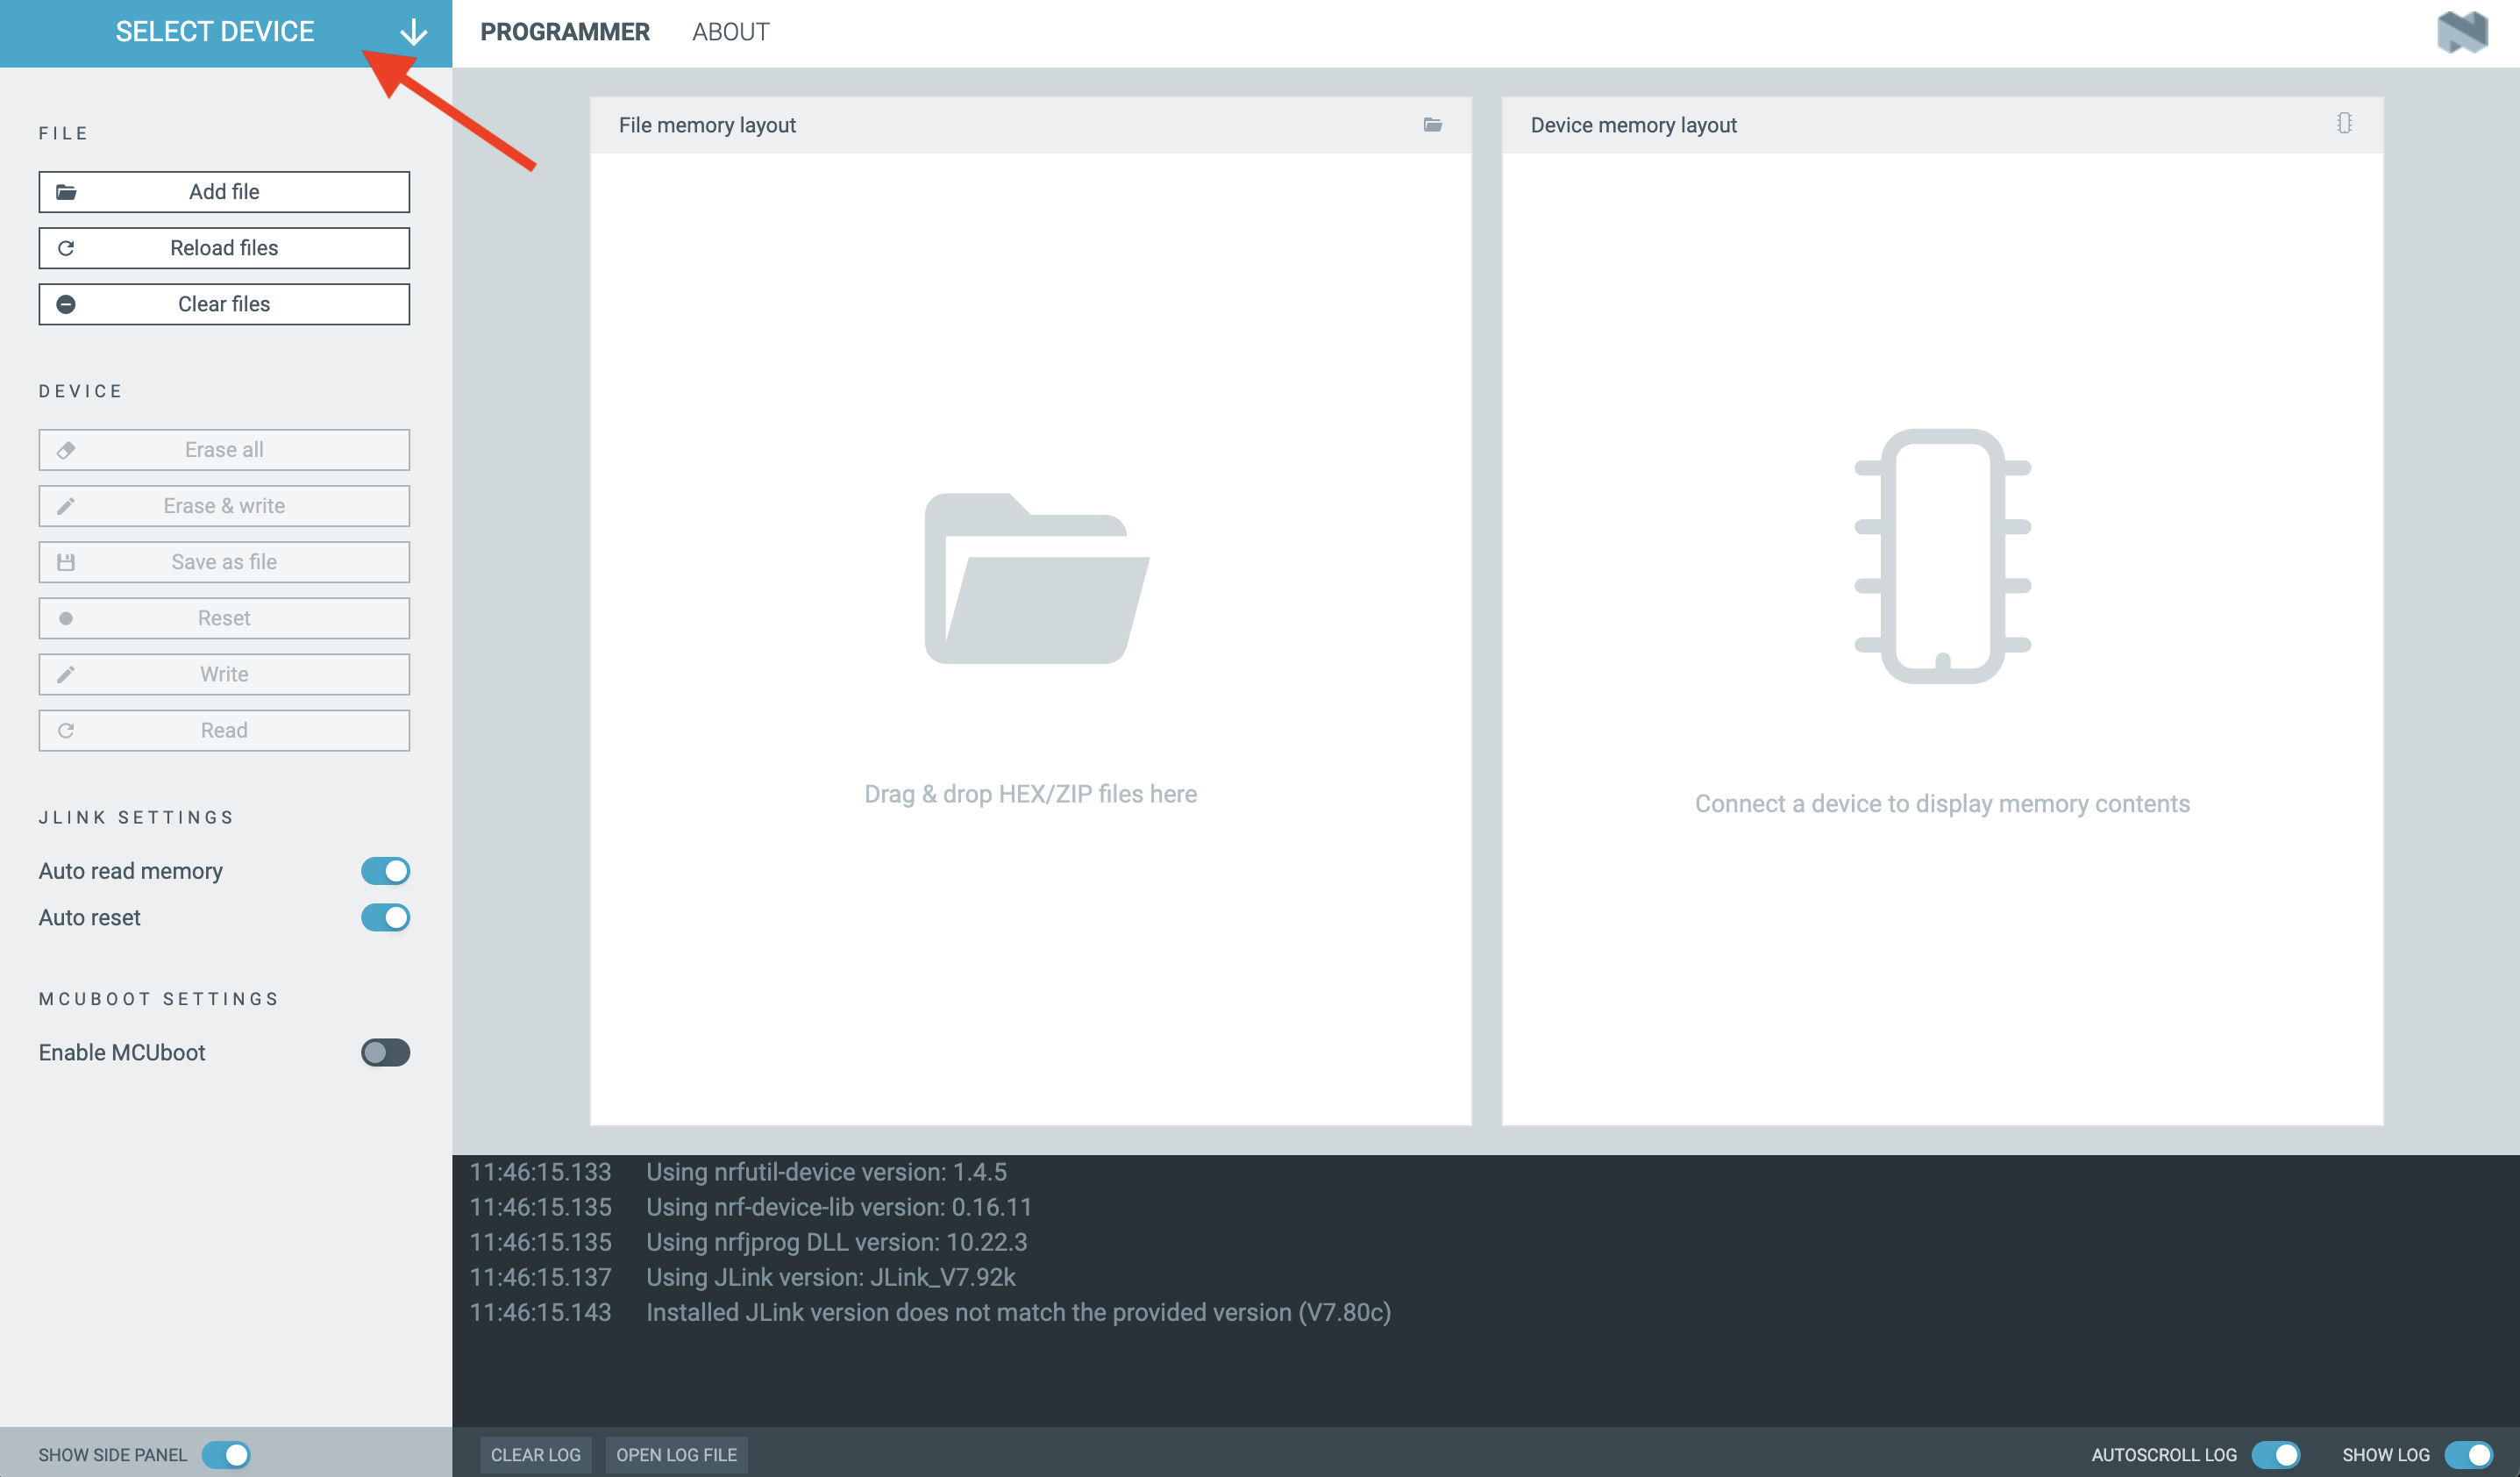
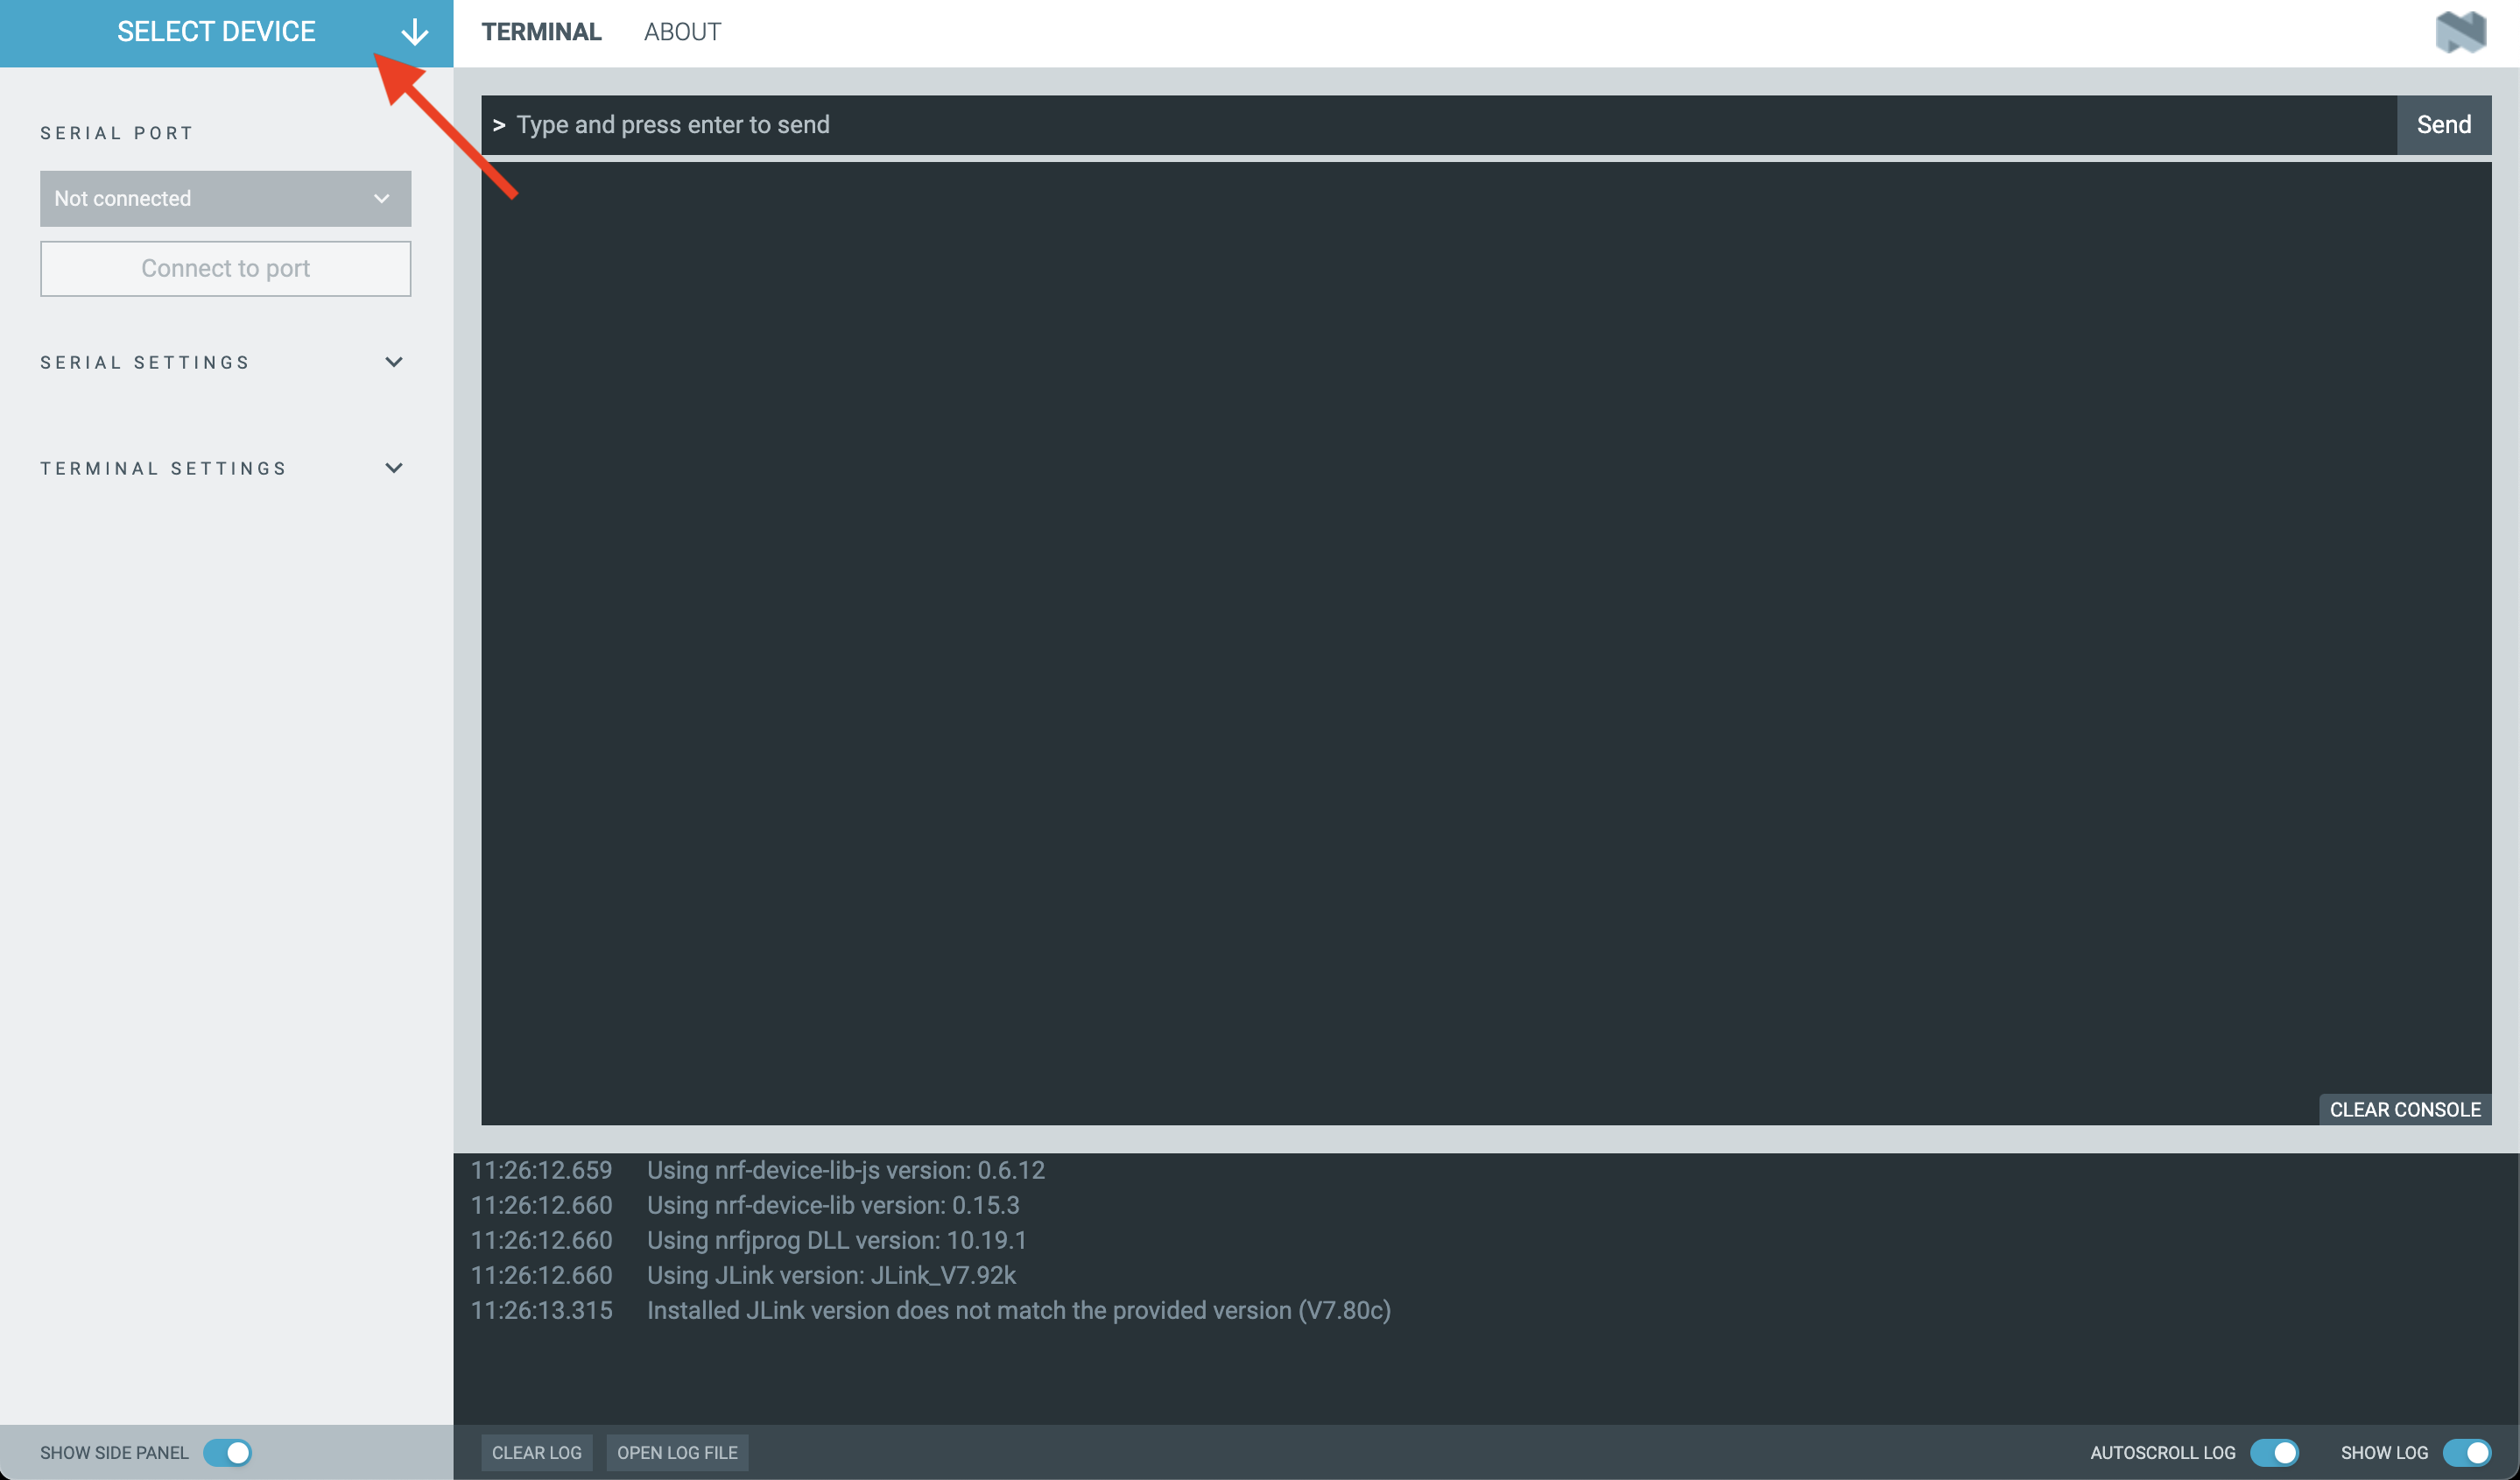
Click on "Select Device" to show the list of available boards:
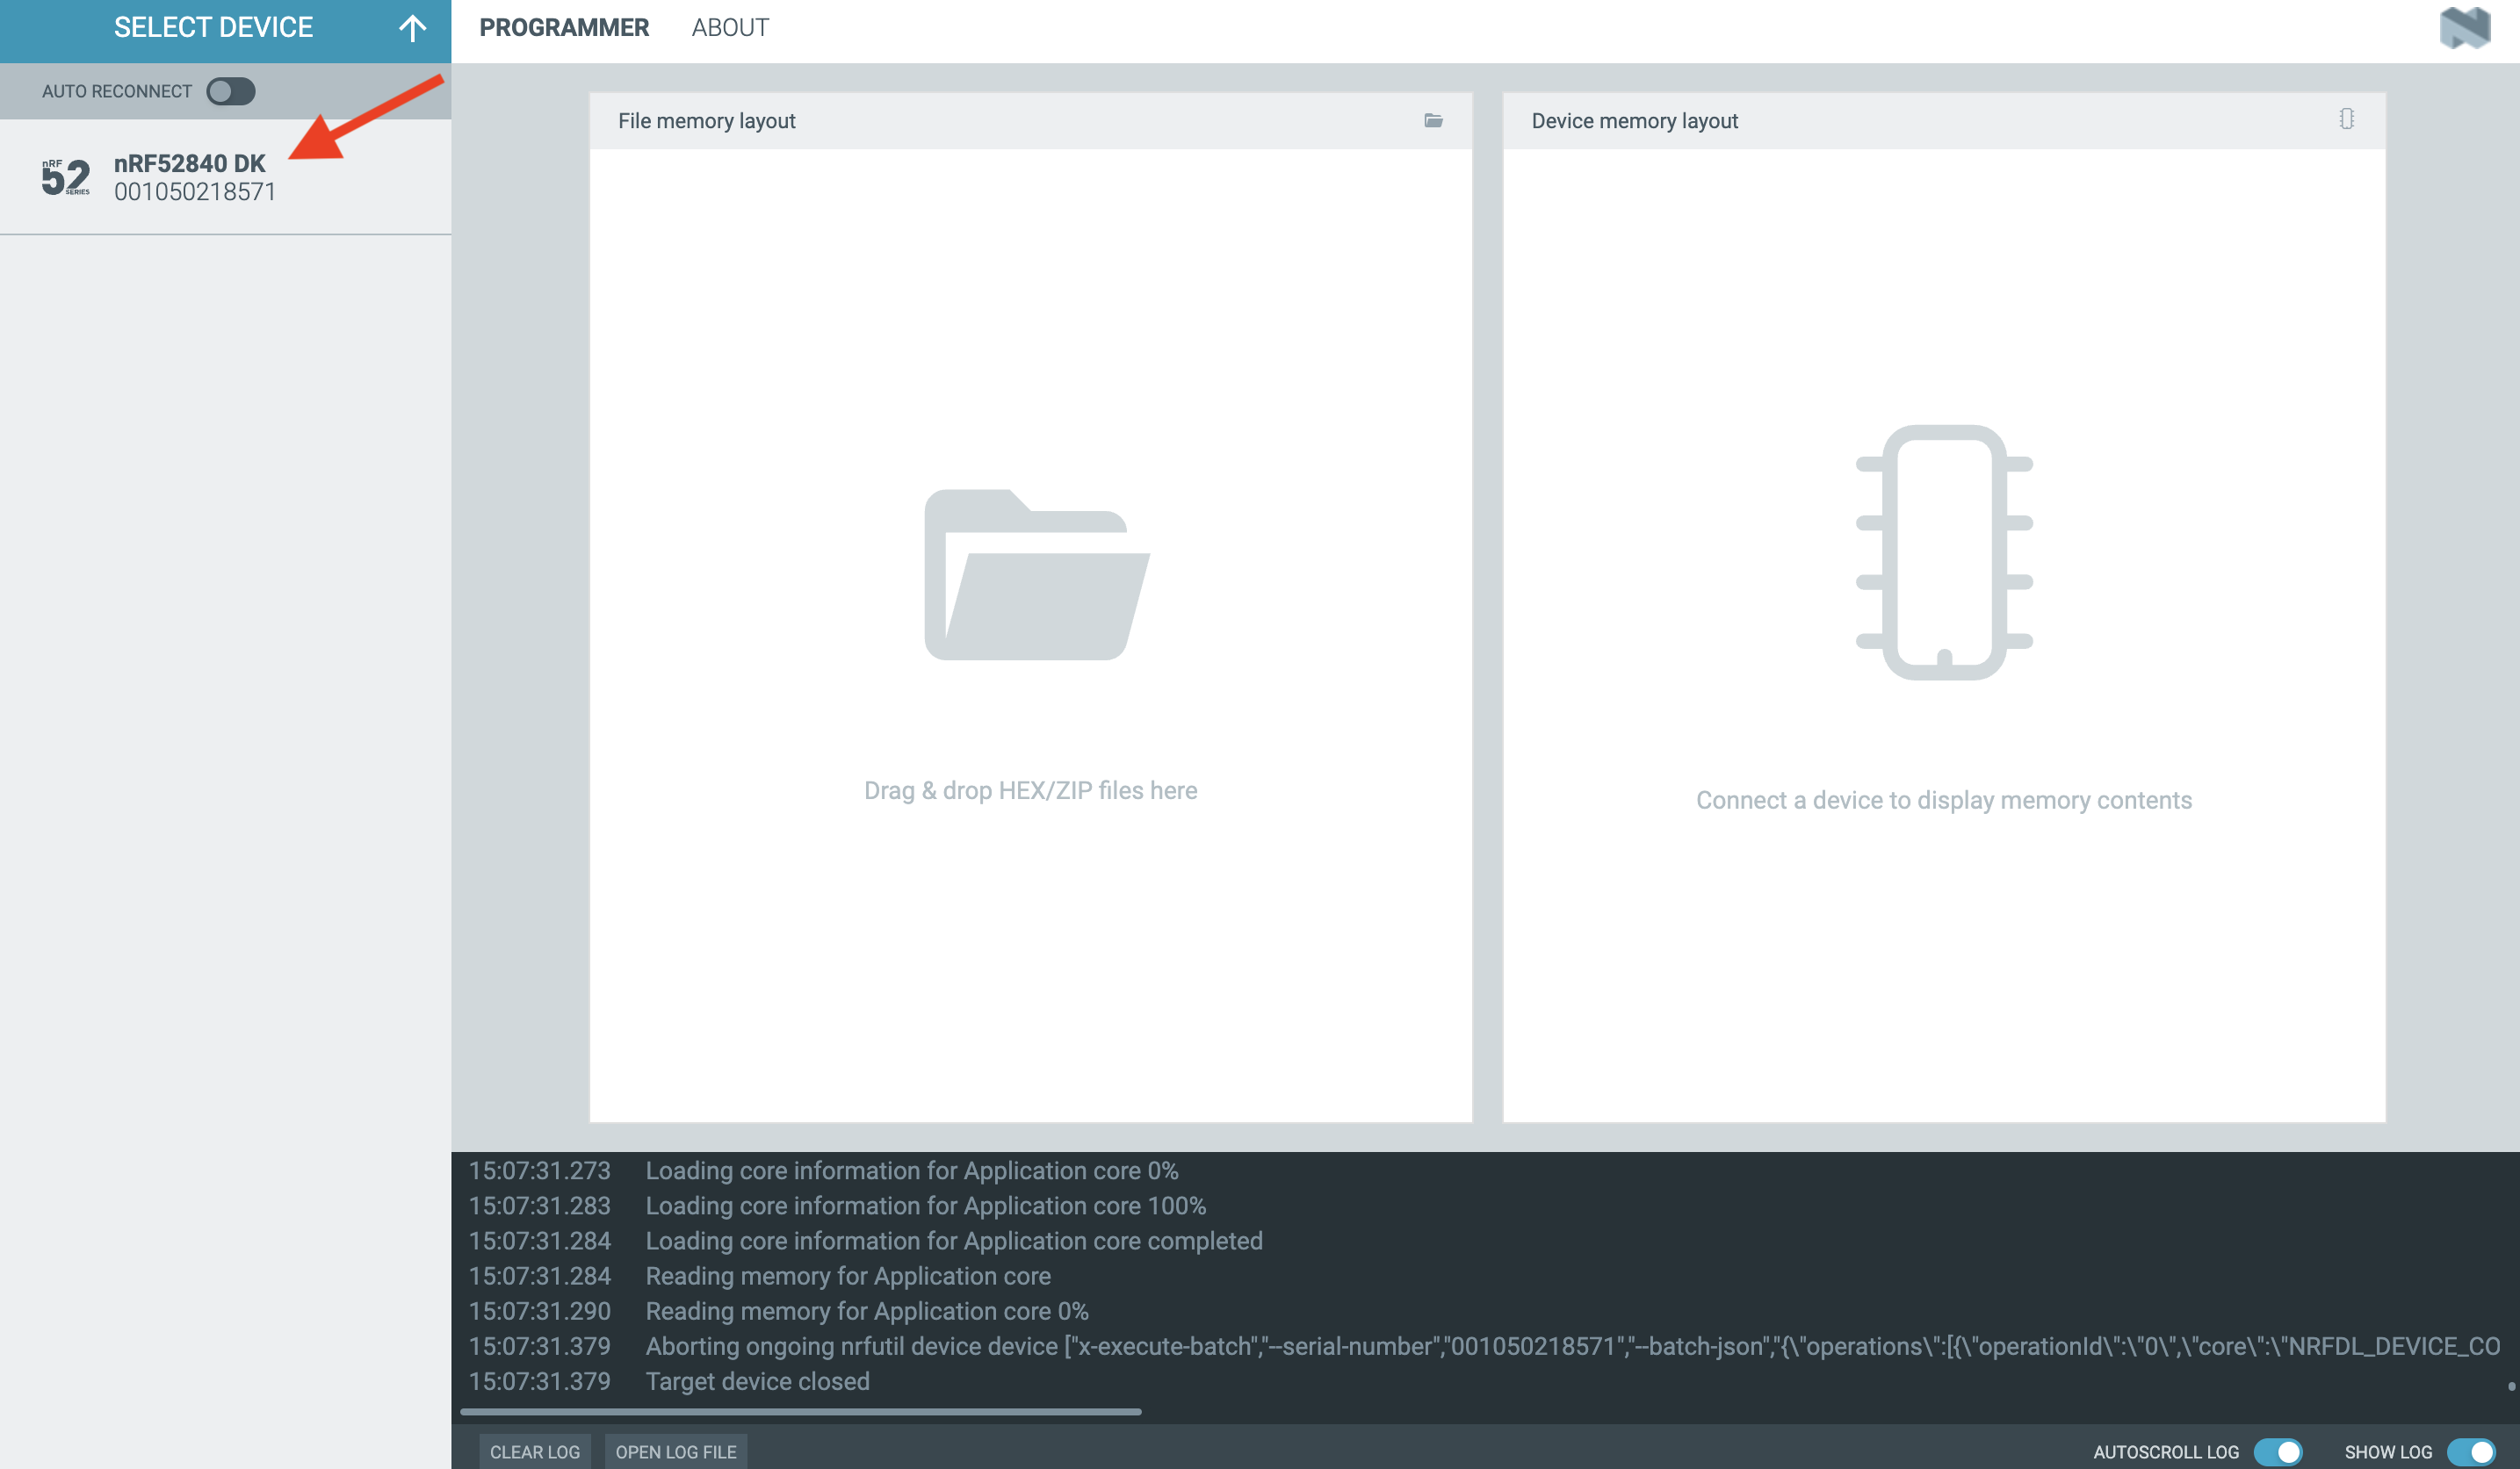
Select the nRF52840 DK board:
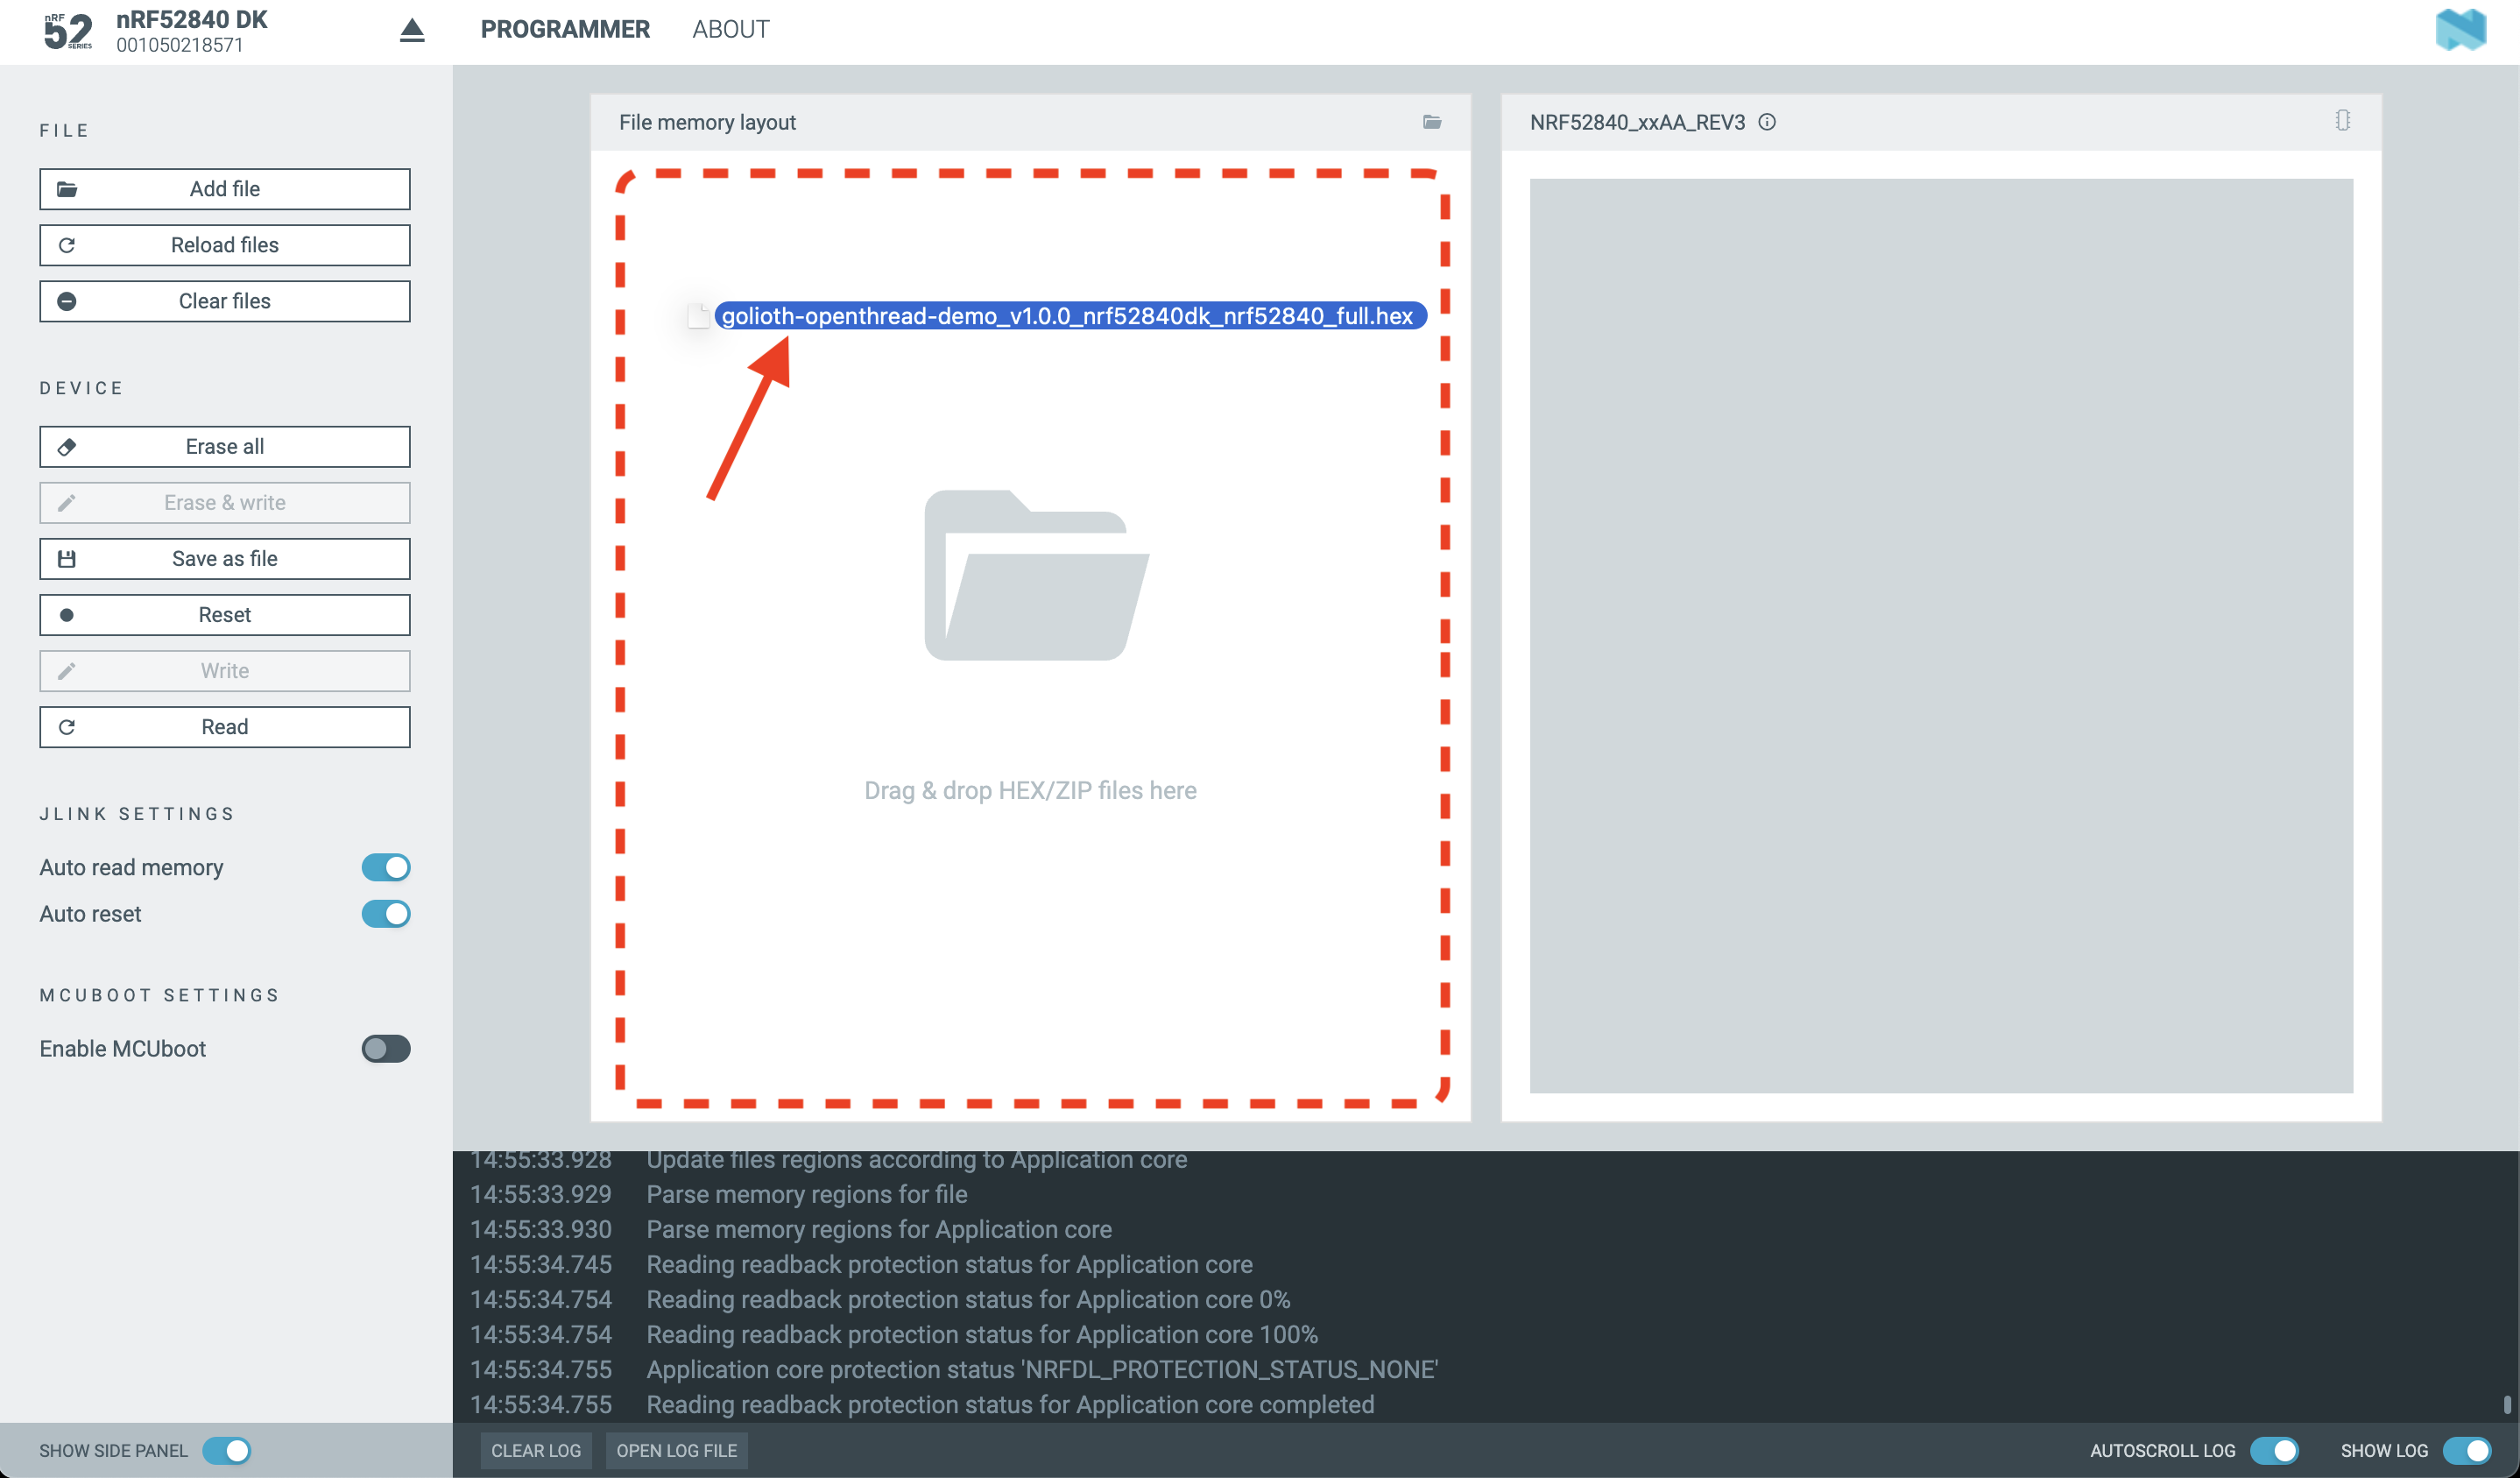
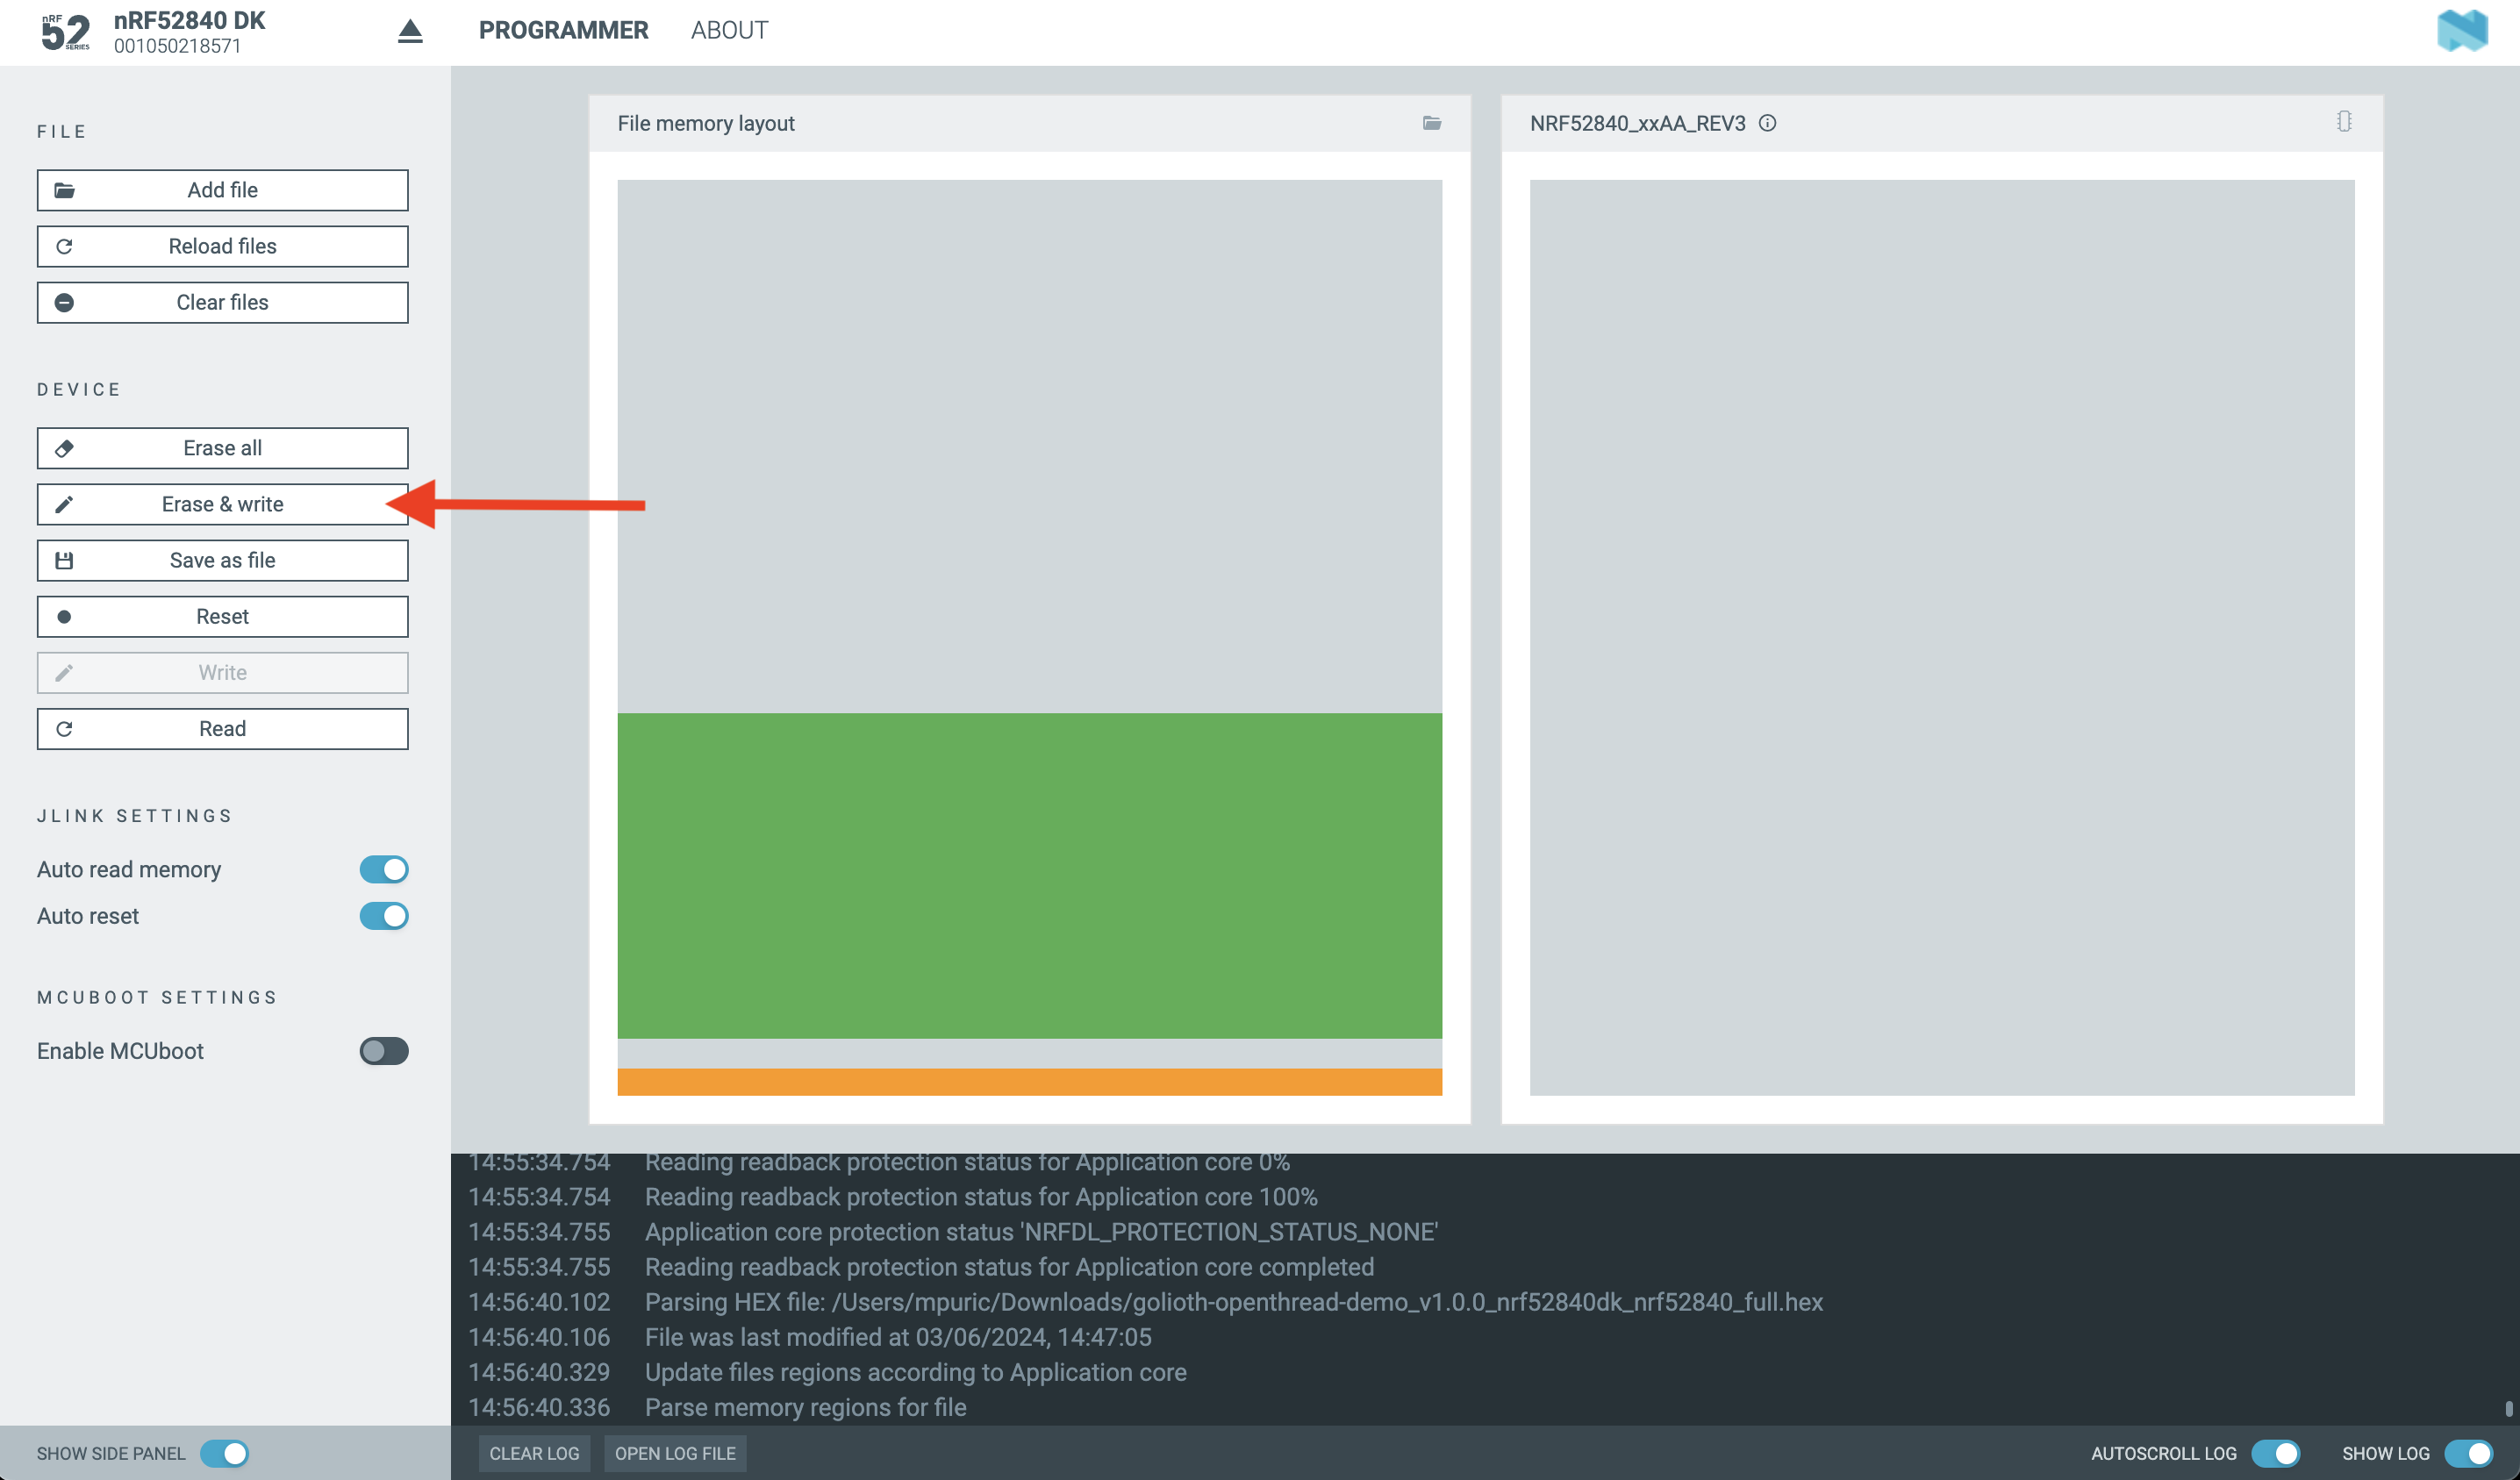
Drag & Drop the golioth-openthread-demo_vX.X.X_nrf52840dk_nrf52840_full.hex file onto the "File memory layout" pane:
Click "Erase & Write" to program the firmware image into the device:
Step 4 - Verify firmware with the Serial Terminal app
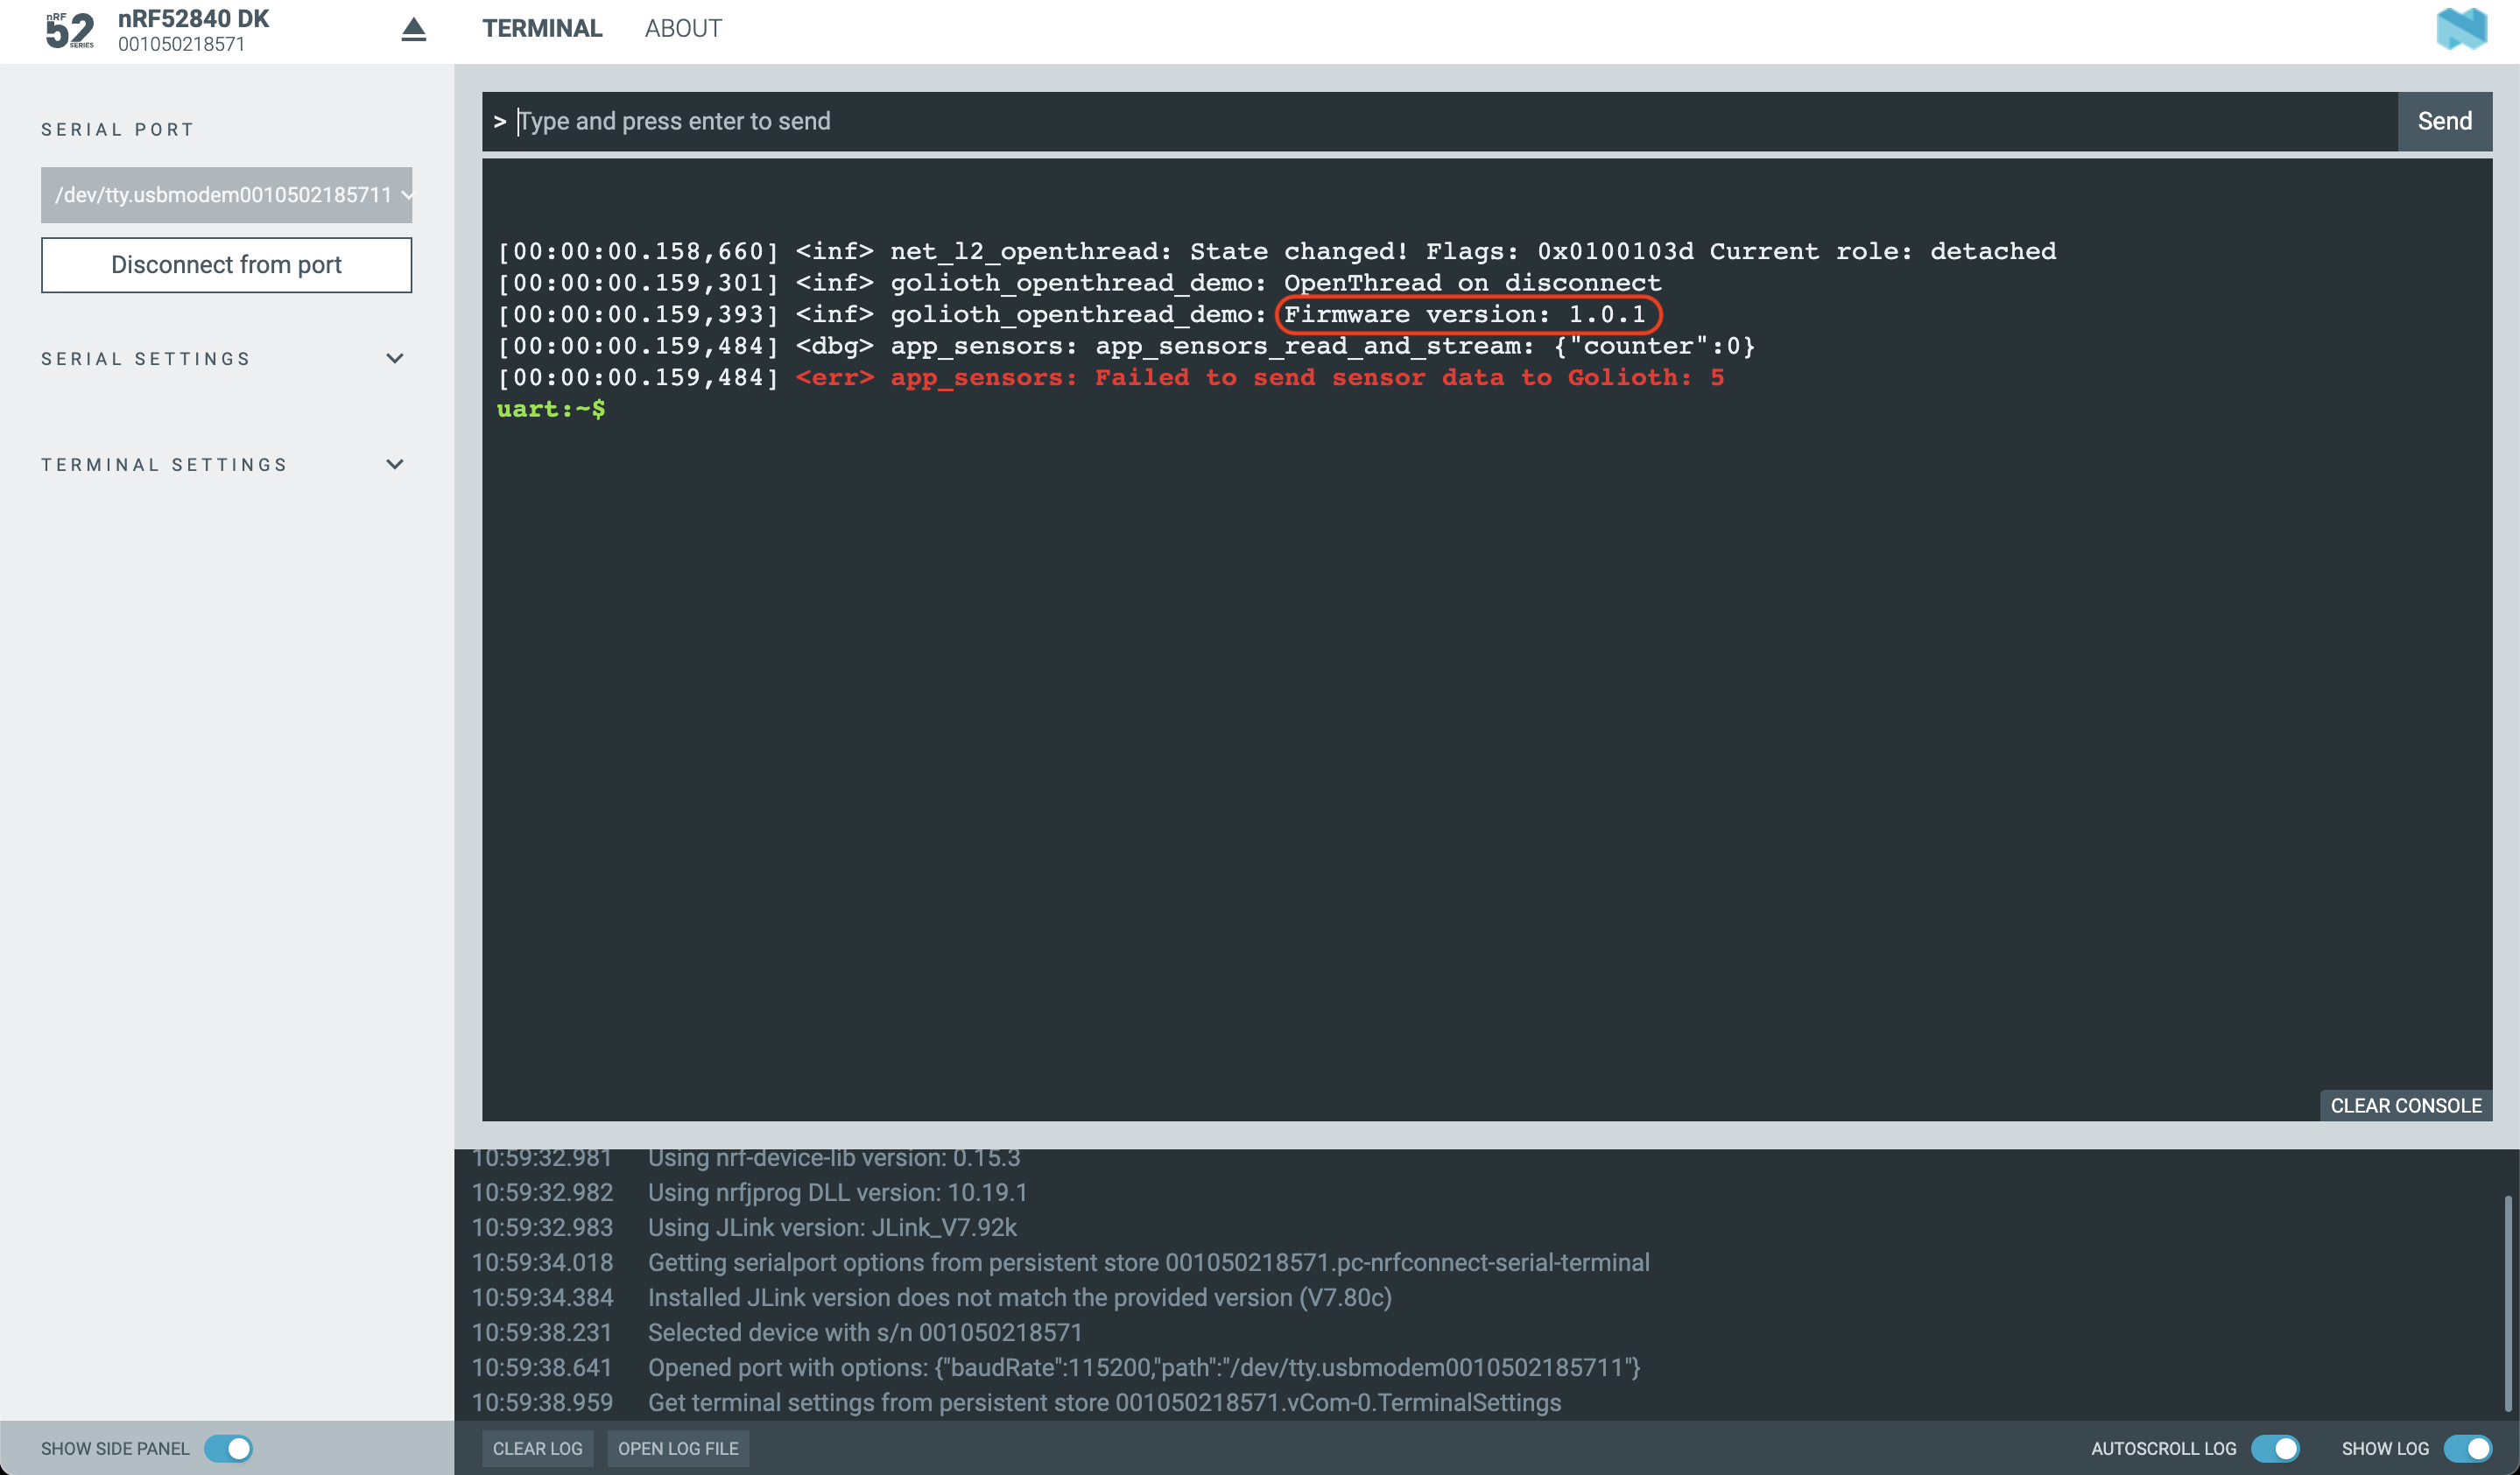
If the firmware was programmed successfully, you can verify the firmware version printed on the serial terminal.
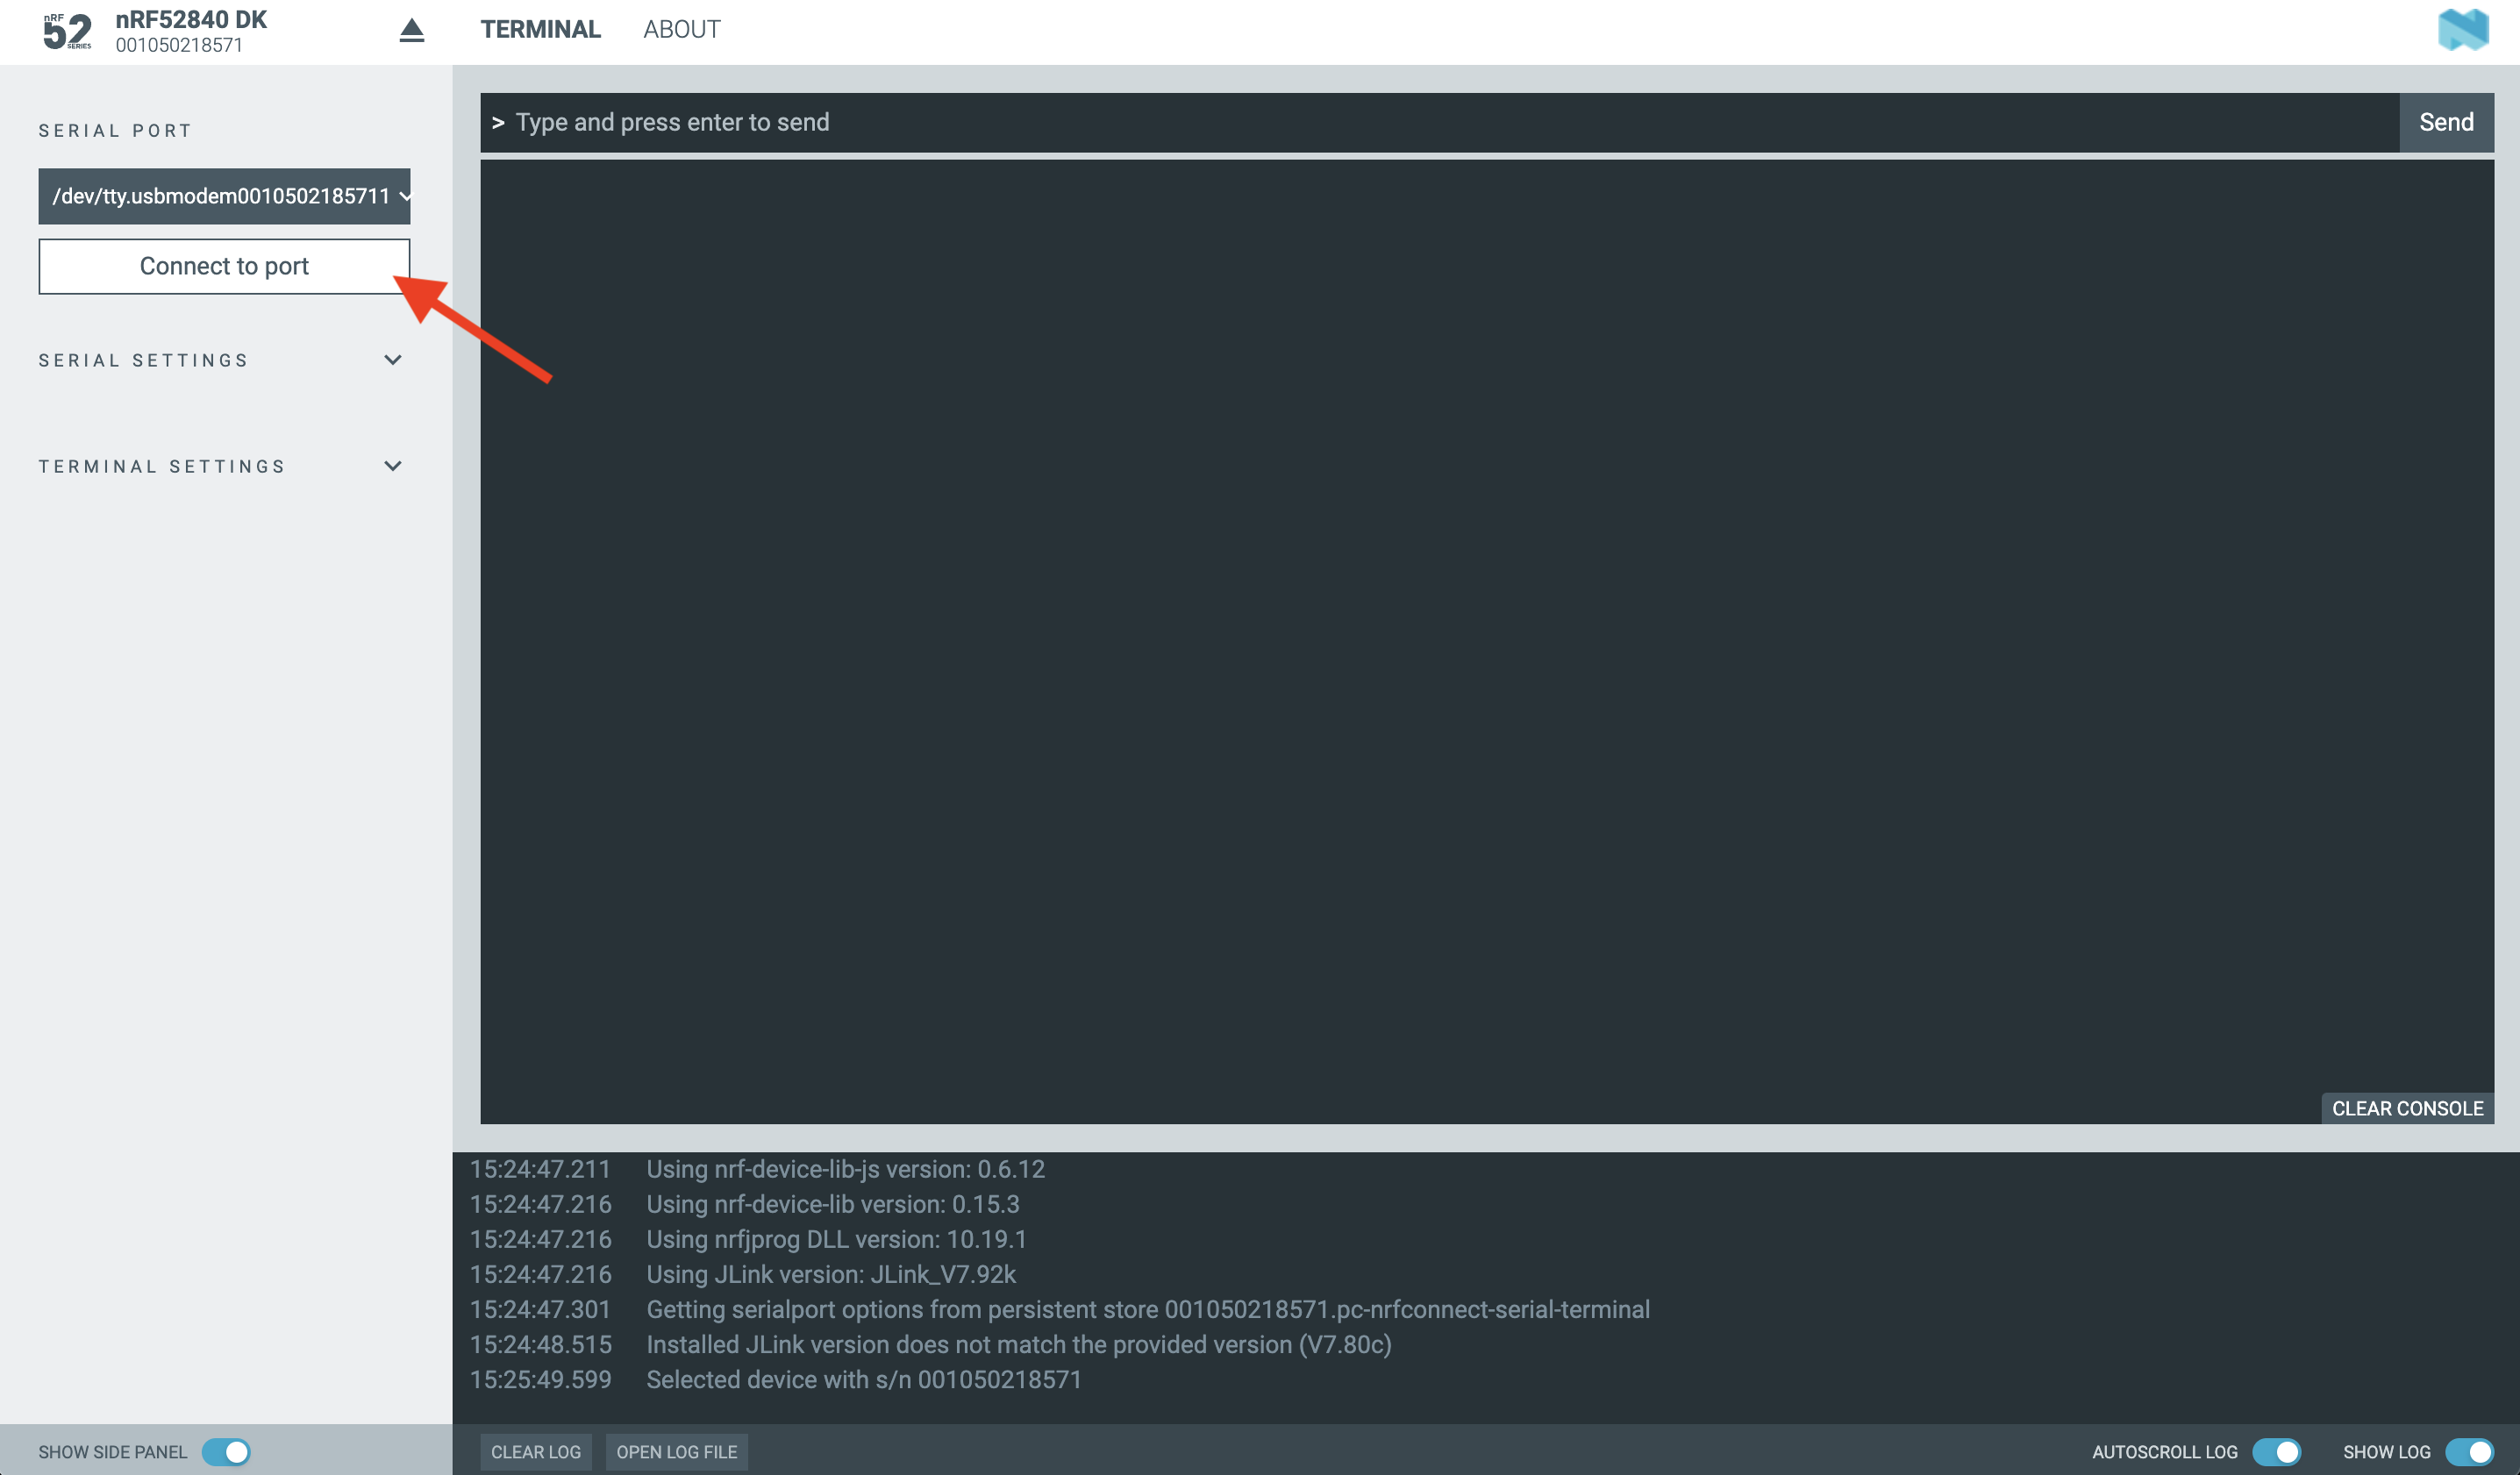
Open the nRF Connect for Desktop Serial Terminal app:
Click on "Select Device" to show the list of available boards:
Select the nRF52840 DK board:
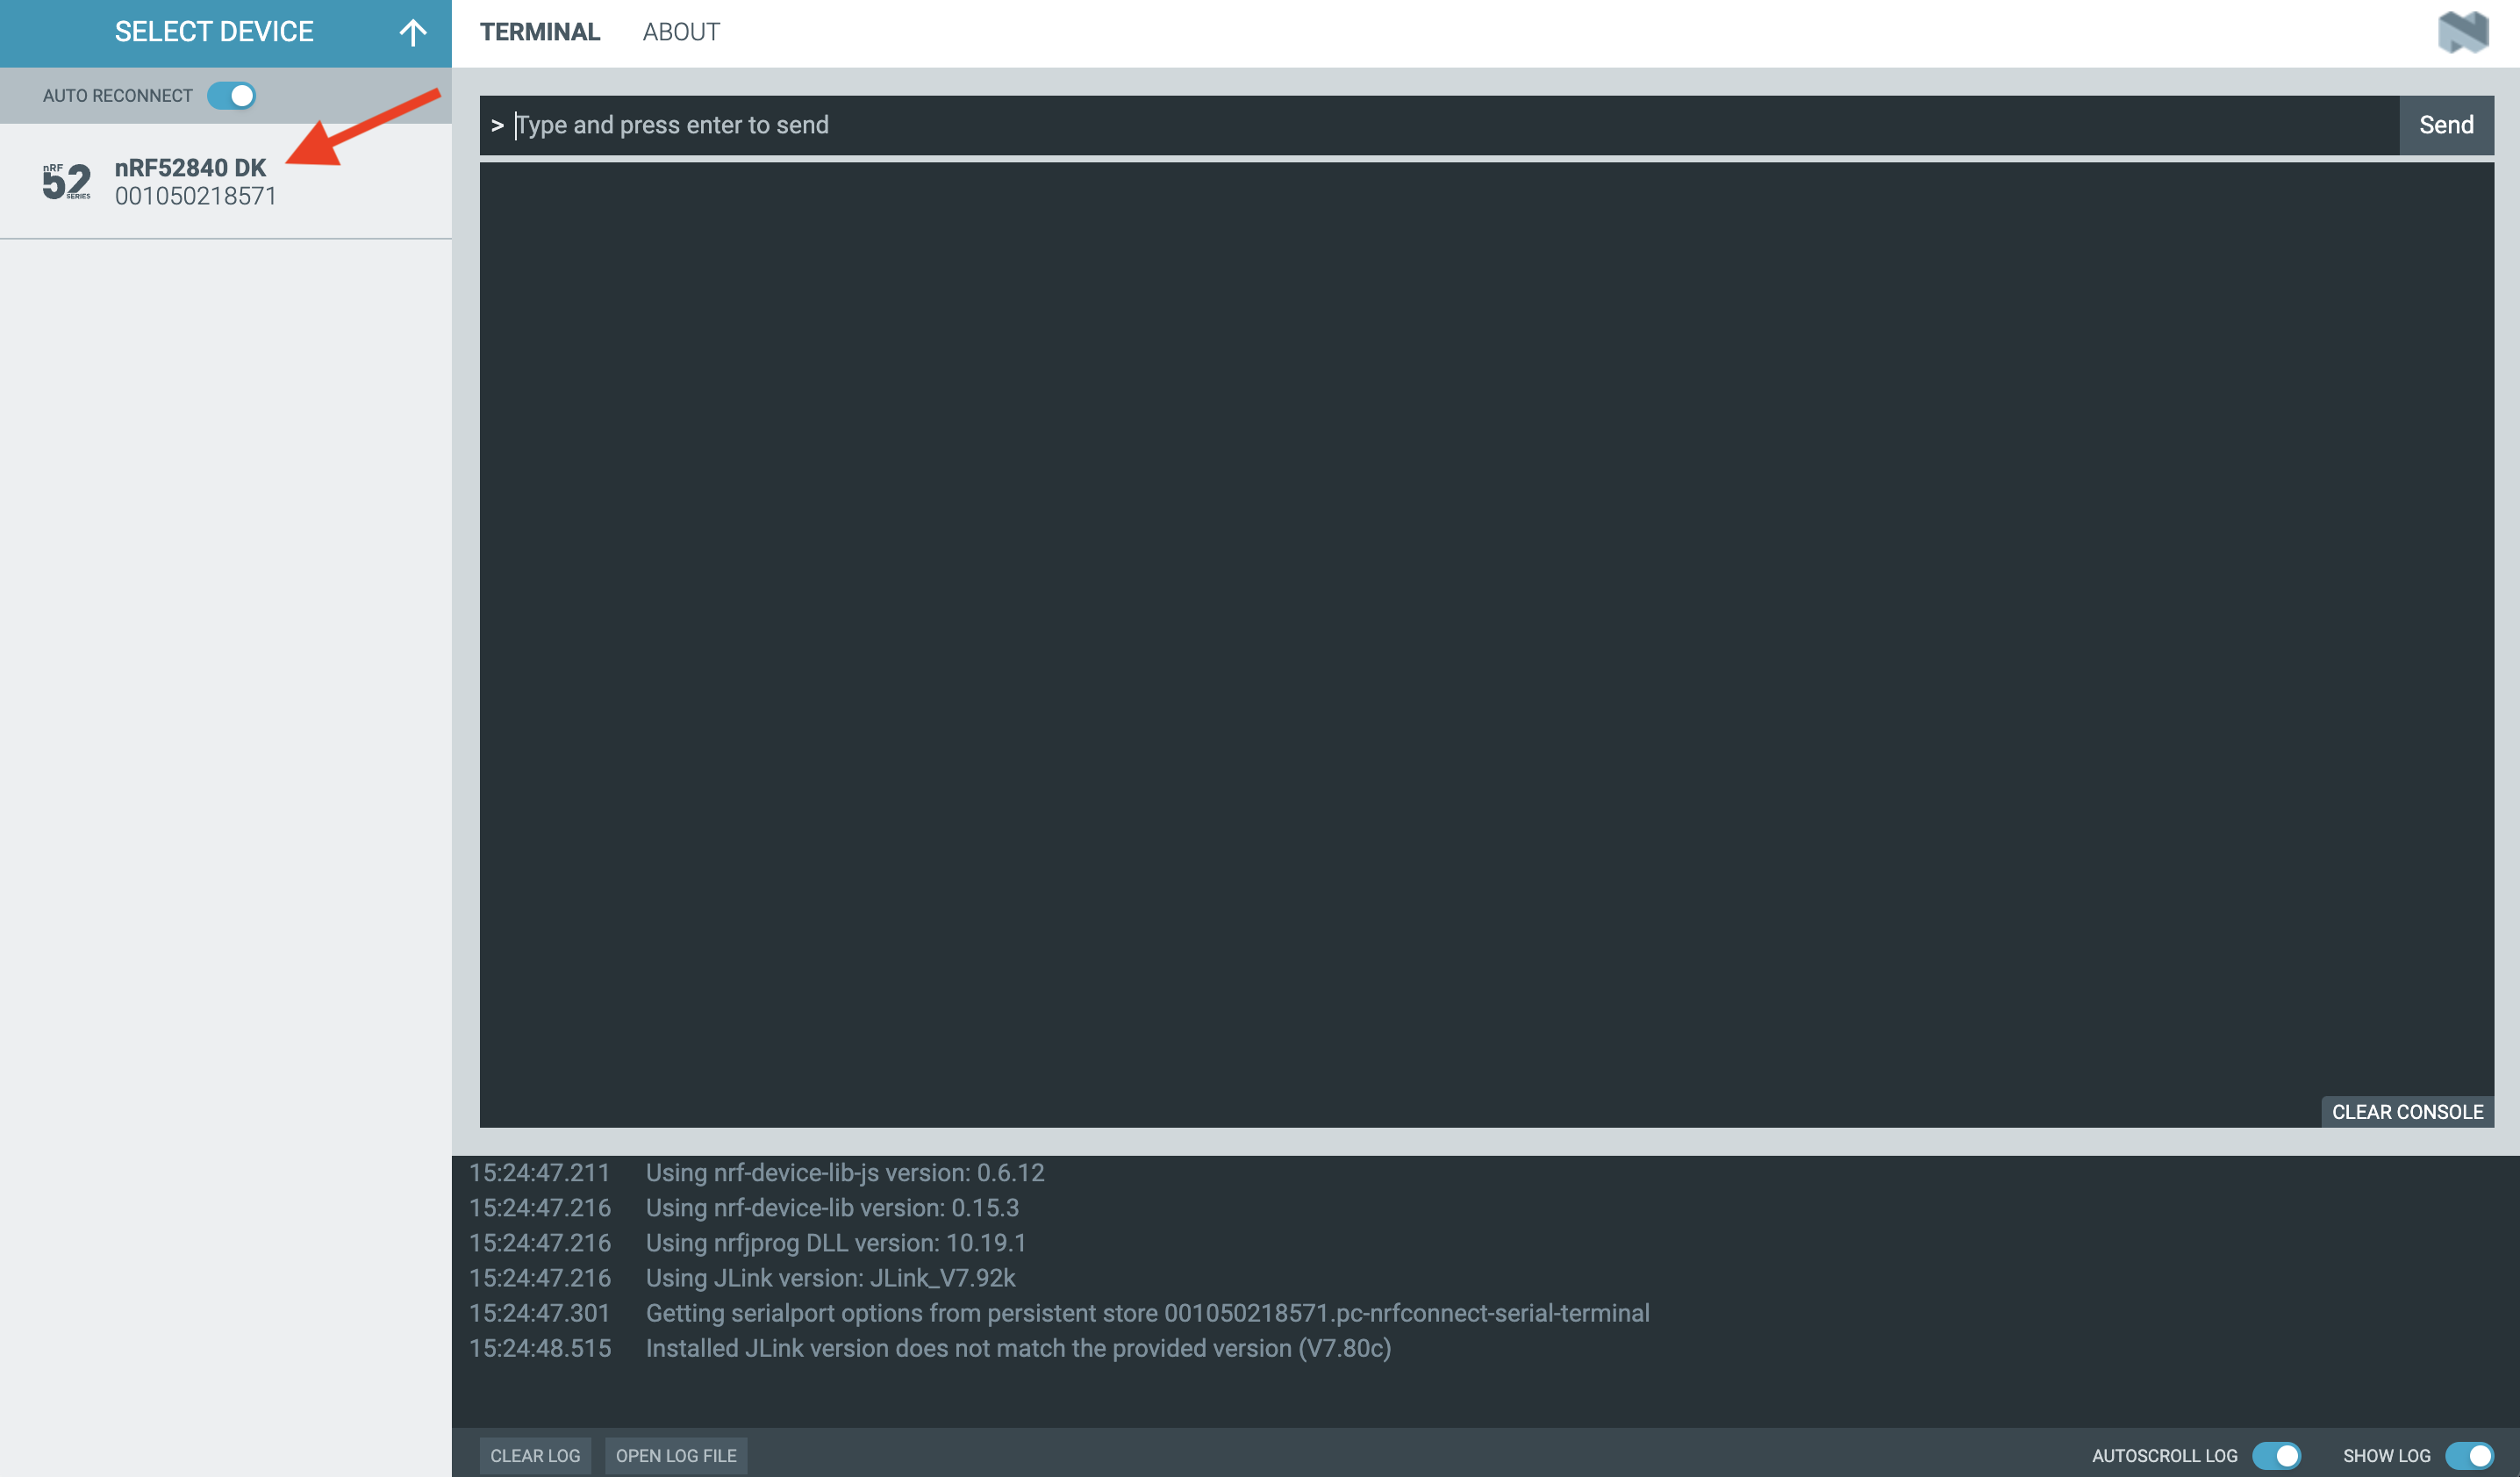
Click "Connect to port":
You should see the firmware version printed in the log output (if you connected
after the log message was printed, press the RESET button on the board):
Connect to Golioth
In this section you will learn how to connect the follow-along hardware to the Golioth Cloud.
Register & Log In
The Golioth Console provides a web-based dashboard for registering & managing your devices.
To get started, log in to the Golioth Console. If you have not already signed up for a Golioth account, choose "Sign Up" to register for a new account first.
Register the Device
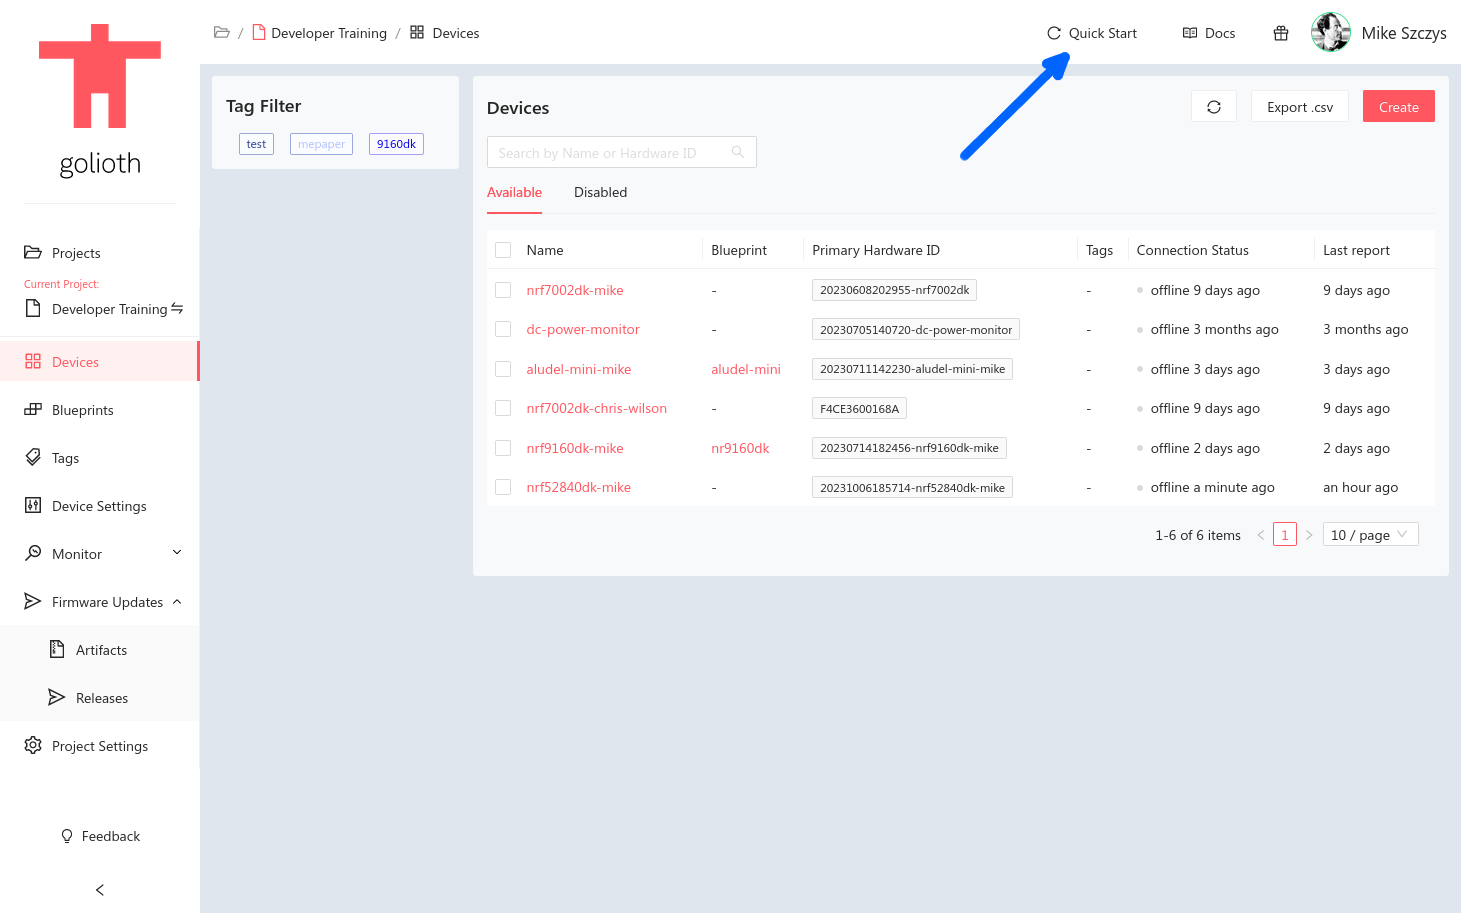
The Quick Start Wizard will guide you through the process of creating your first Project and registering your first device.
Launch the Wizard by clicking on the "Quick Start" button in the top right of the console window.
If you previously registered for Golioth, you may have already created a project and registered a device the first time you used the Quick Start Wizard. Feel free to skip this section and register a new device in your existing project instead of creating a new project via the Quick Start Wizard.
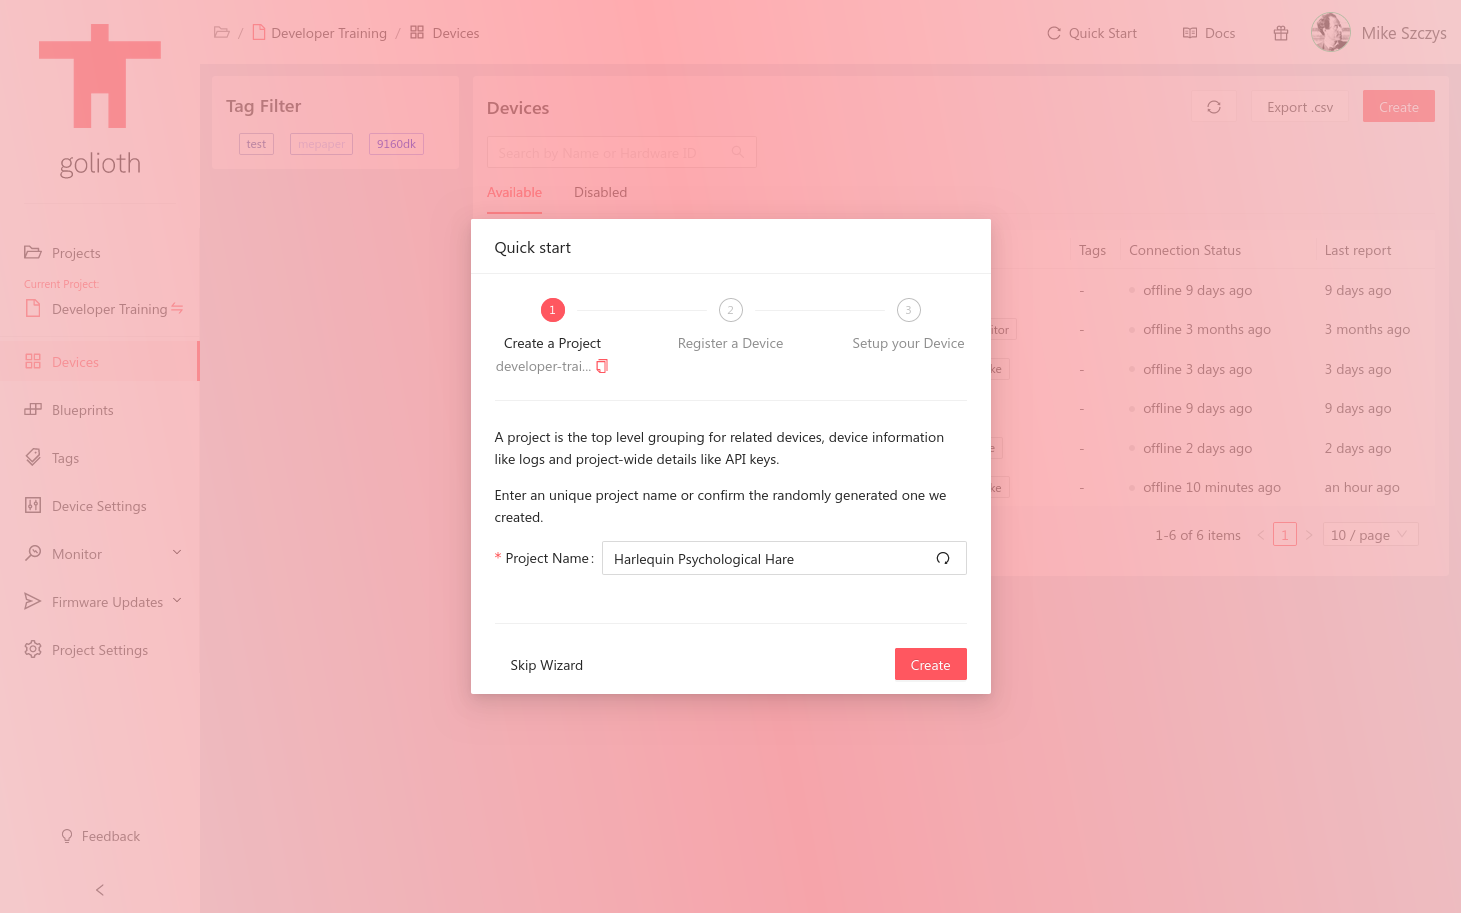
Step 1 - Create a Project
All devices must belong to a Project. Before you can register the device you must create a Project in the Golioth Console.
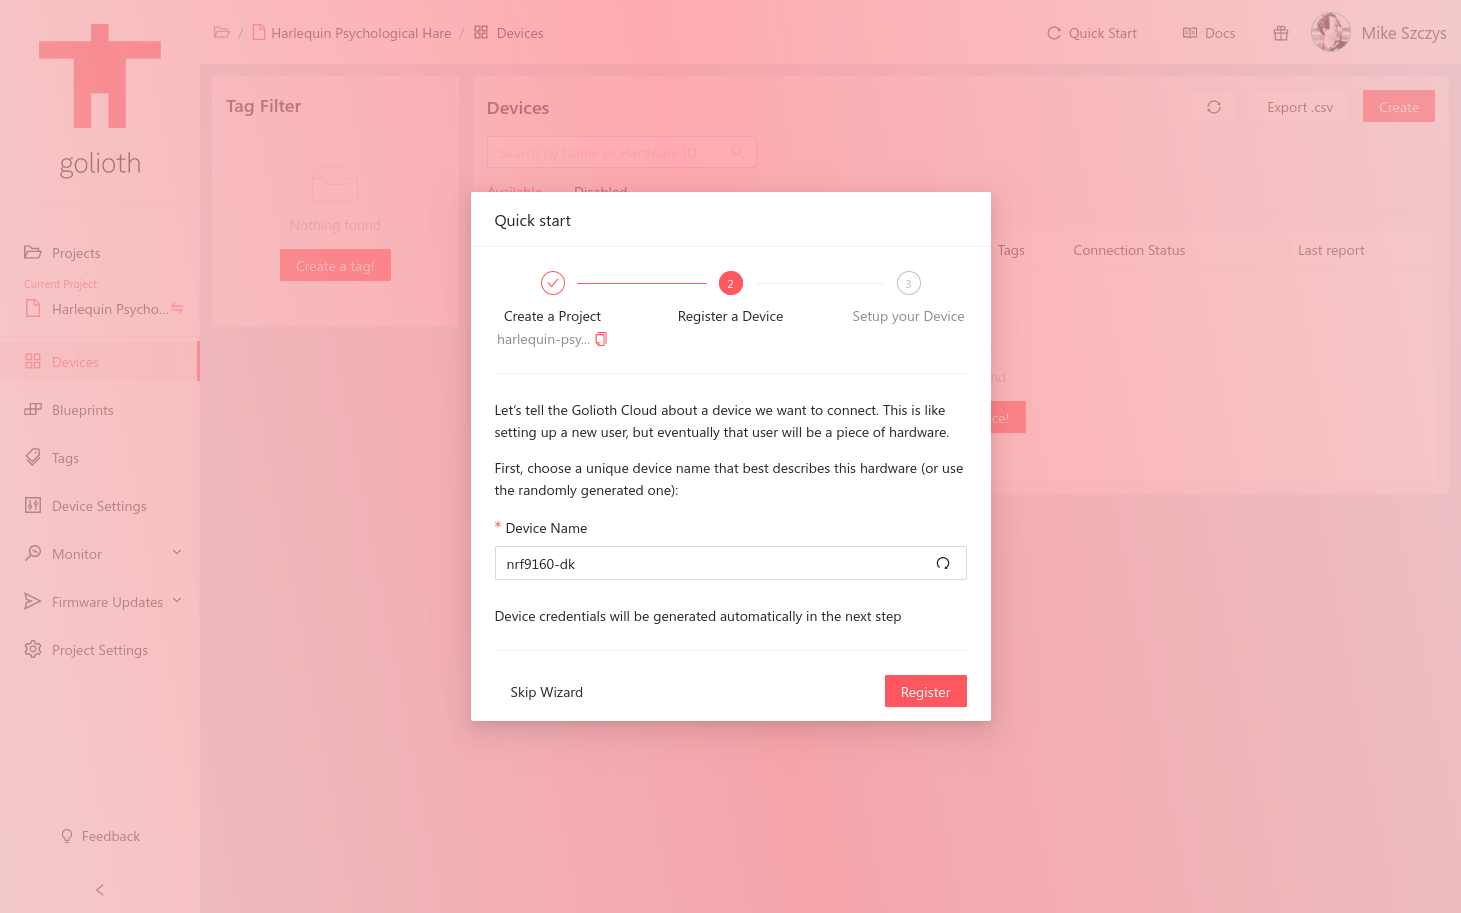
Step 2 - Register a Device
Choose a name for the device or use the randomly generated one.
Step 3 - Setup your Device
The Quick Start Wizard will automatically generate pre-shared key credentials for the device that was just registered.
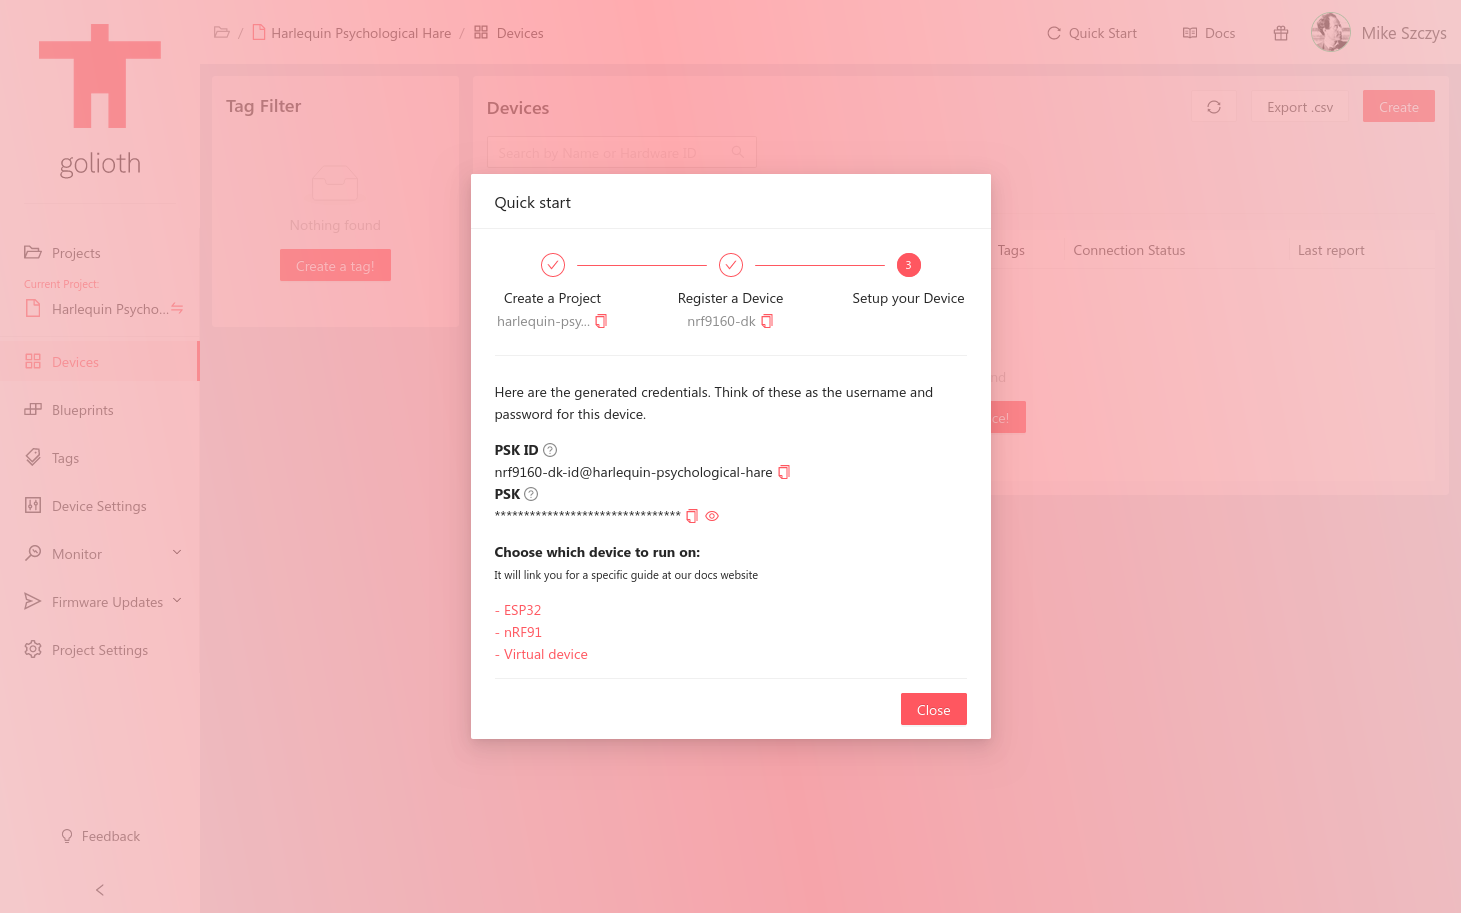
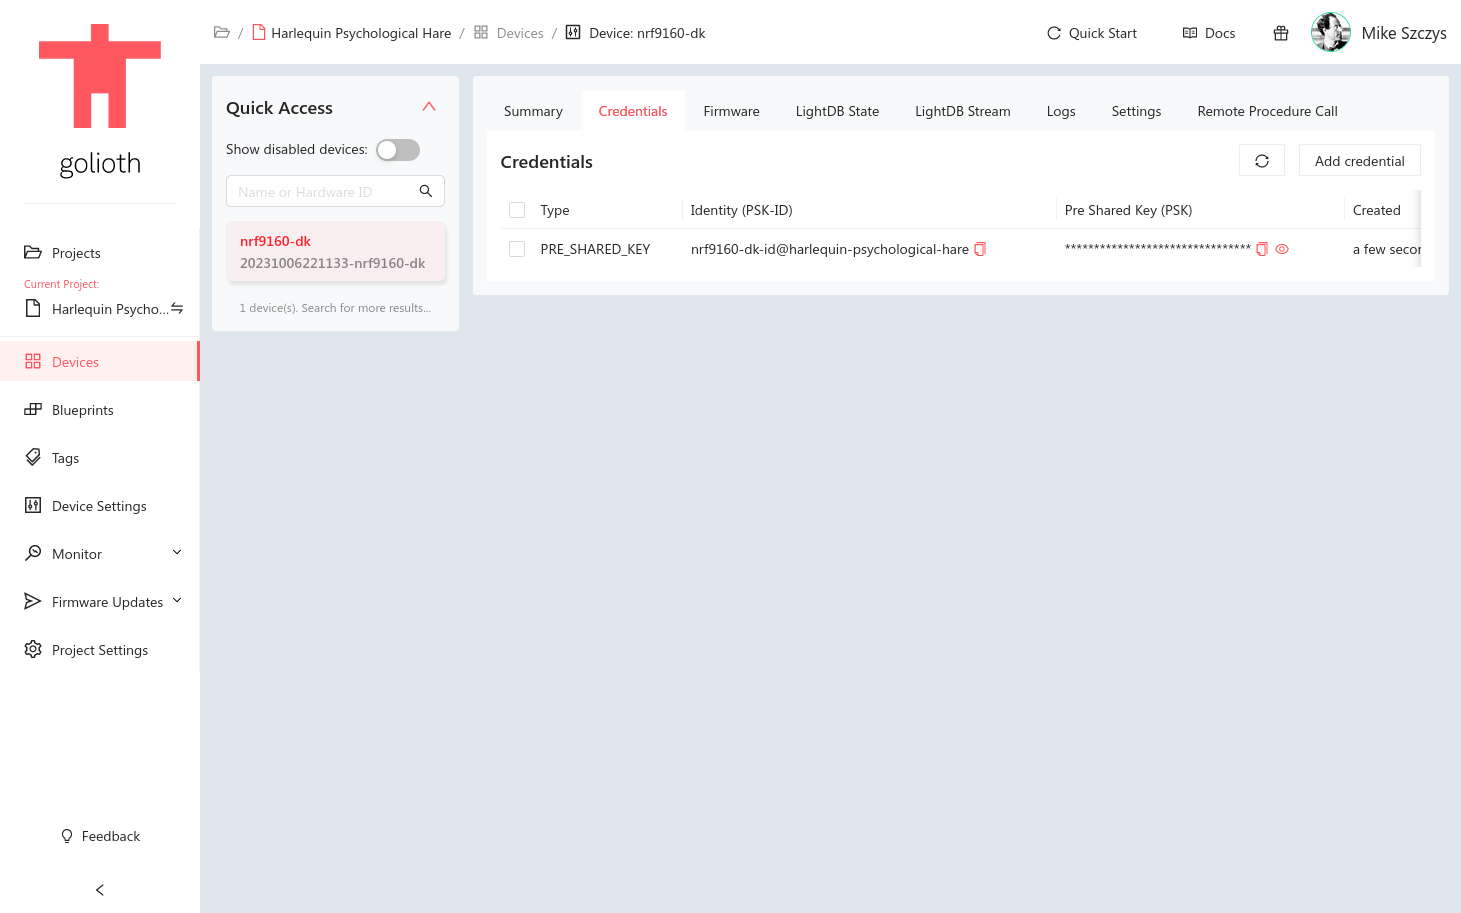
After you click "Close" in the Quick Start Wizard, you can always find these credentials again on the device's "Credentials" tab.
Provision the Device
Now that the device is registered in the Golioth Console, the device hardware needs to be provisioned with the pre-shared key that was generated in the previous step.
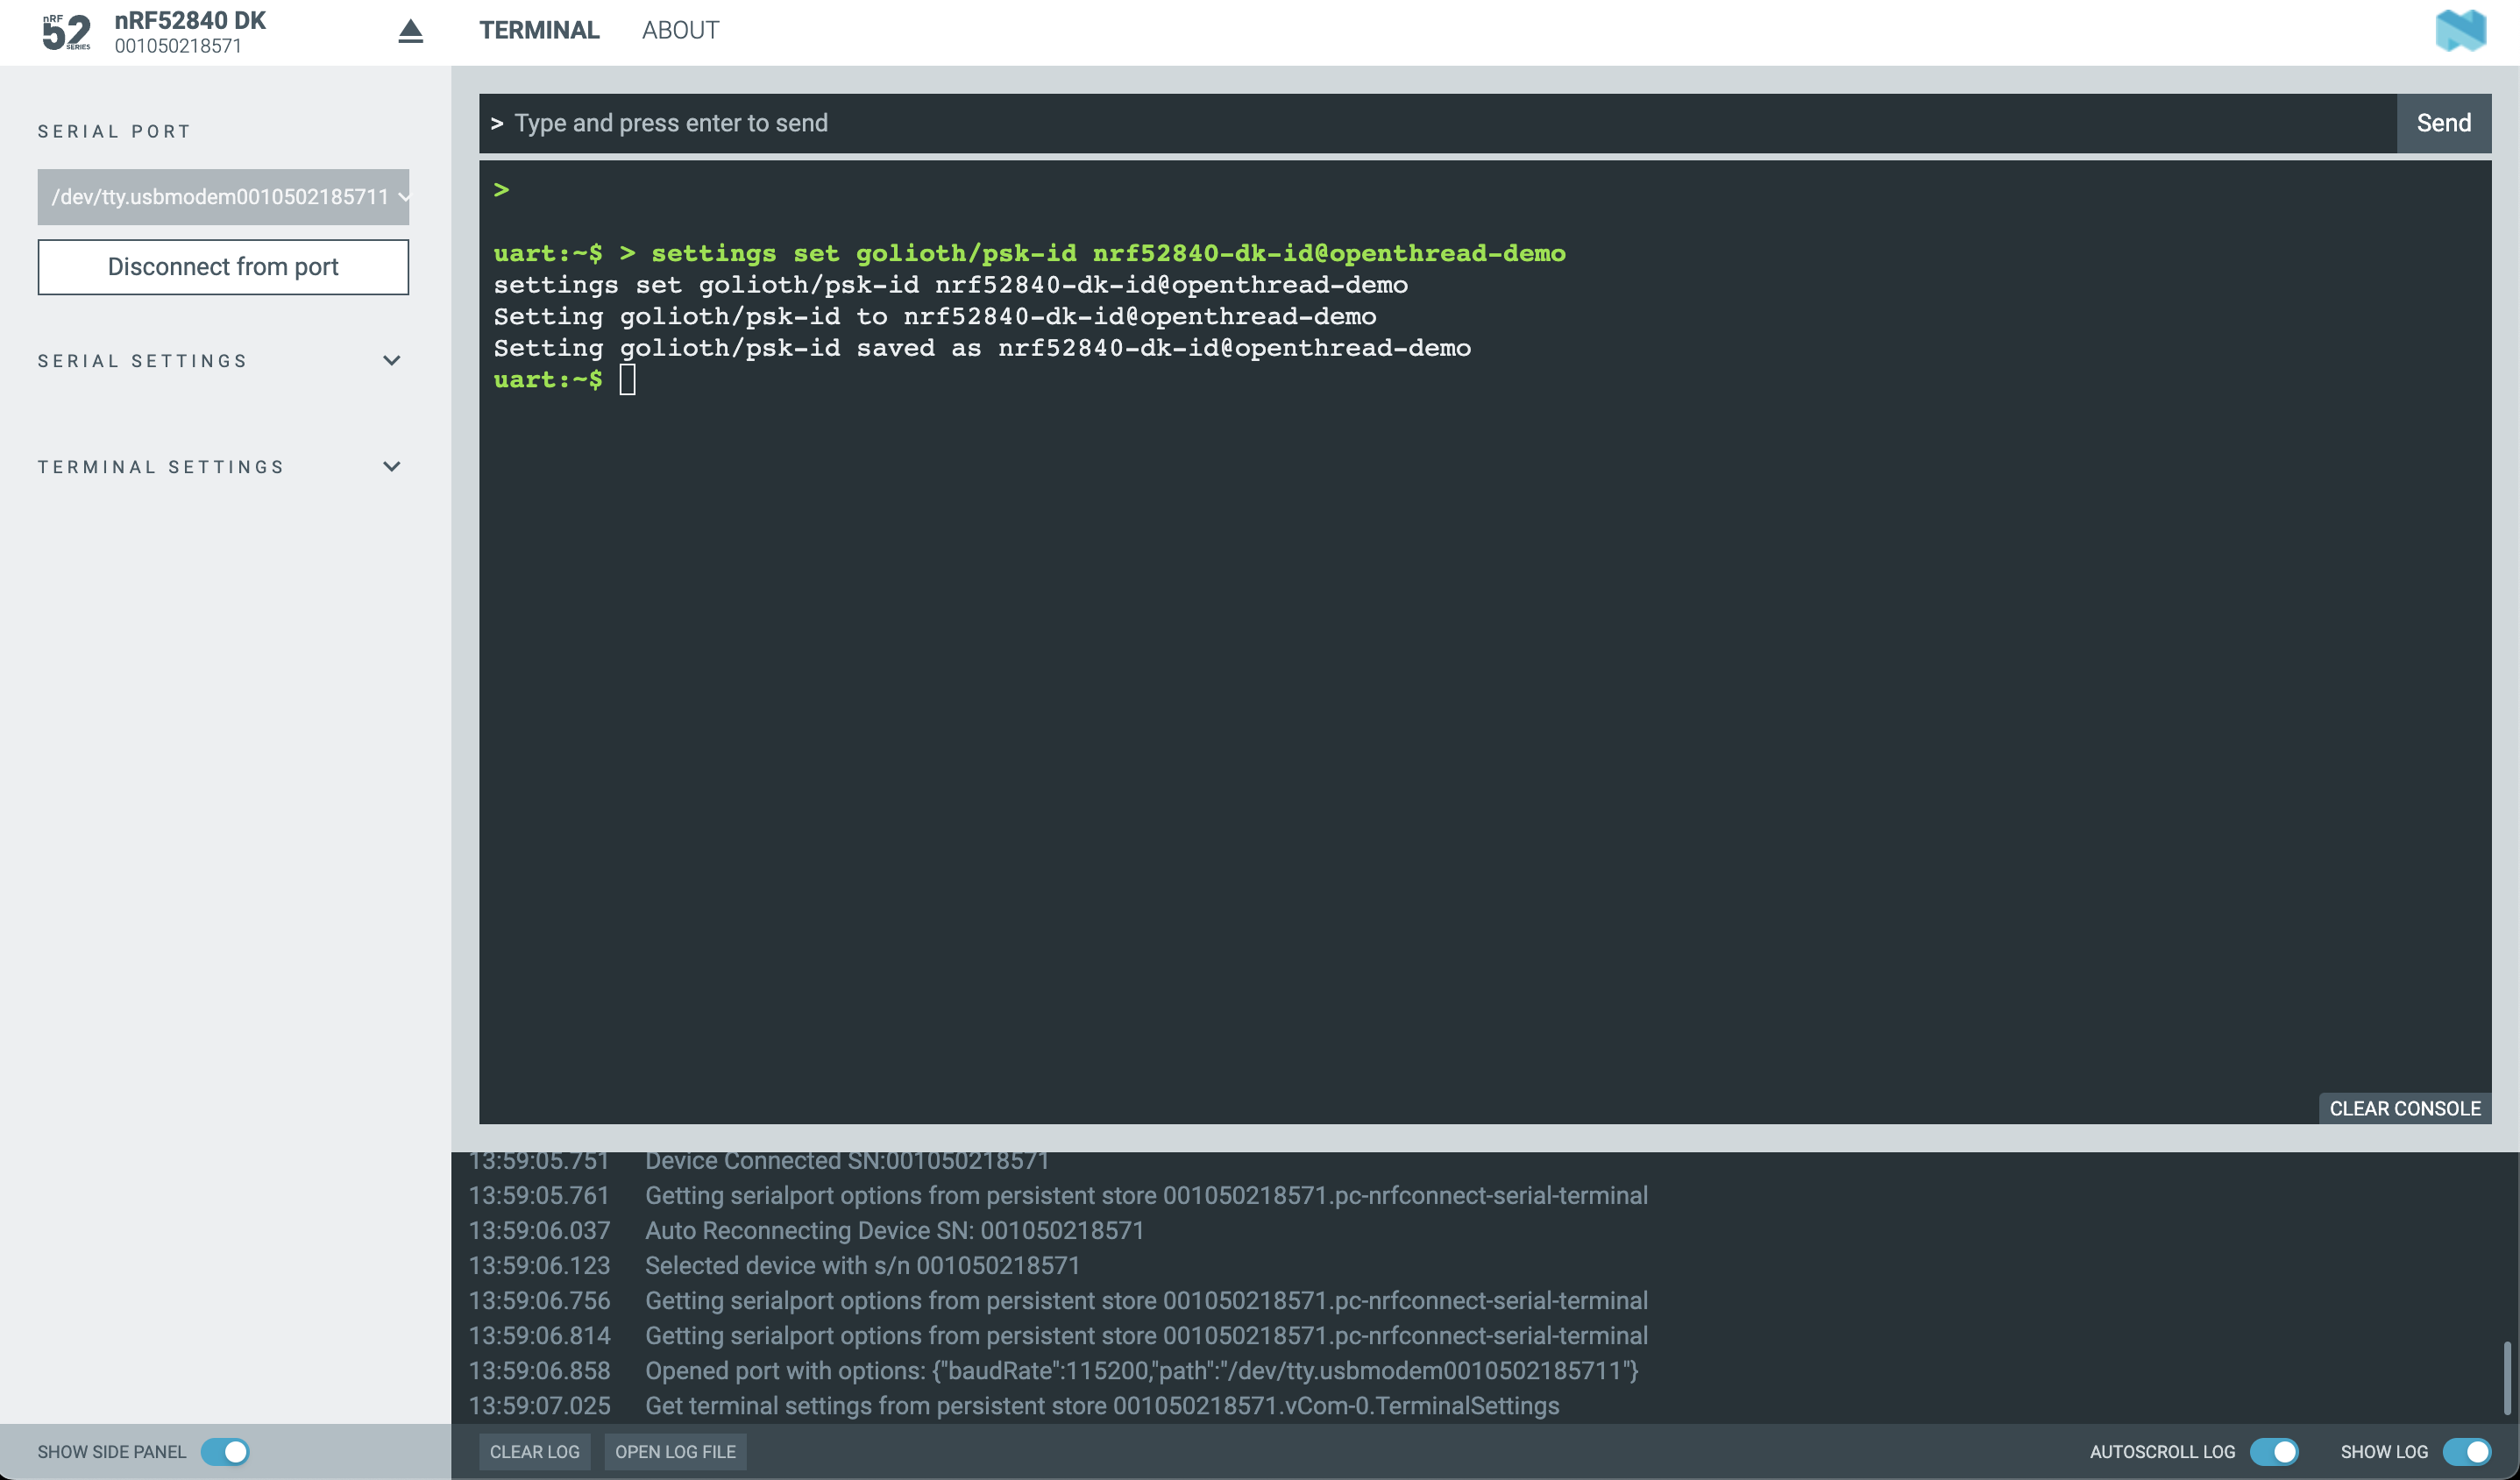
In the nRF Connect for Desktop Serial Terminal (or your preferred serial terminal application), set the following values using the device shell:
uart:~$ settings set golioth/psk-id <my-psk-id@my-project>
uart:~$ settings set golioth/psk <my-psk>
uart:~$ kernel reboot cold
For example, setting the golioth/psk-id should look like this:
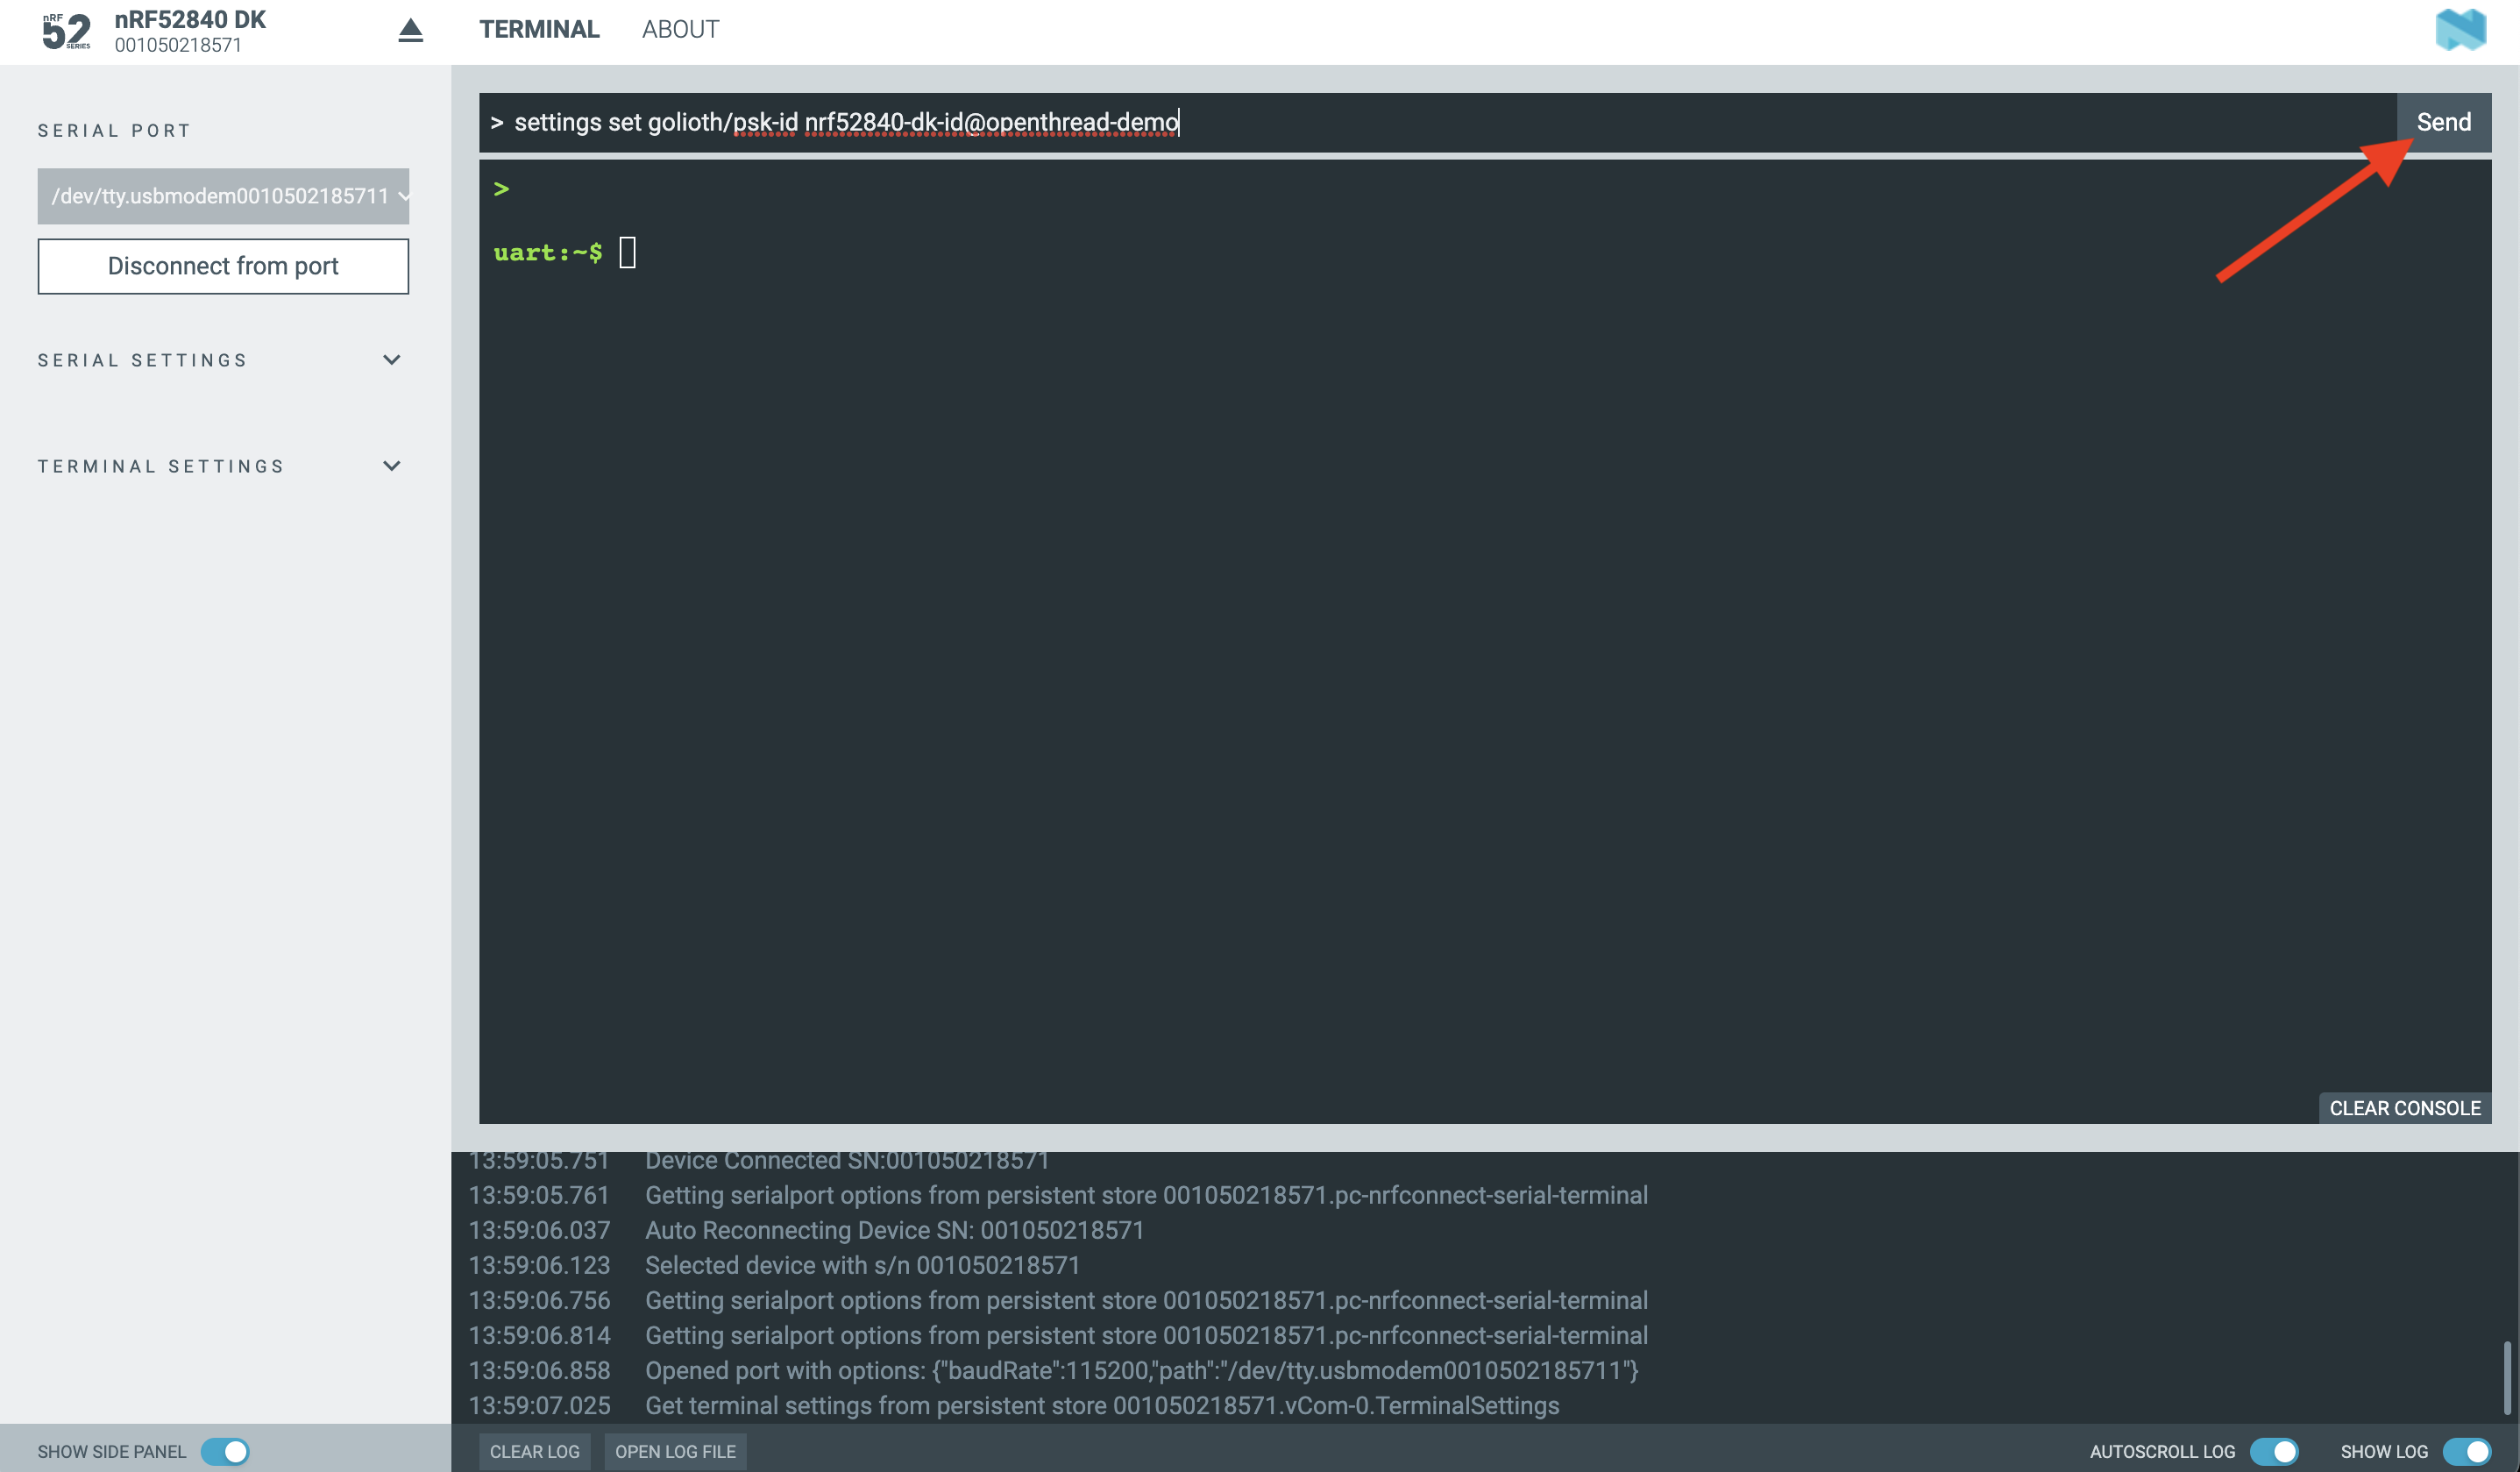
After clicking the "Send" button, you should see the command output showing that the PSK-ID was saved to the device's non-volatile storage:
Add device to Thread Network
The OpenThread shell gives you the ability to configure and query the state of
the Thread network you are connecting to. Many of the commands available on the
command line (shell) are also available as settings in menuconfig and can be
set via project settings (prj.conf) or in board settings (<boardname>.conf)
inside the boards folder. We are going to set these manually because learning
is important. You will set the credentials of your device using the same
credentials (Network Key and Network Name) of your Border Router.
Use the ot command to query and set configurations in the OpenThread stack:
In the nRF Connect for Desktop Serial Terminal (or your preferred serial
terminal application), set the following values using the device shell:
uart:~$ ot ifconfig down
uart:~$ ot dataset networkkey 00112233445566778899aabbccddeeff
uart:~$ ot dataset networkname golioth-thread
uart:~$ ot dataset commit active
uart:~$ ot ifconfig up
uart:~$ ot thread start
This should give us the credentials to get the nRF52840 DK onto the local Thread network created by the Border Router.
Run the following command to check status:
uart:~$ ot state
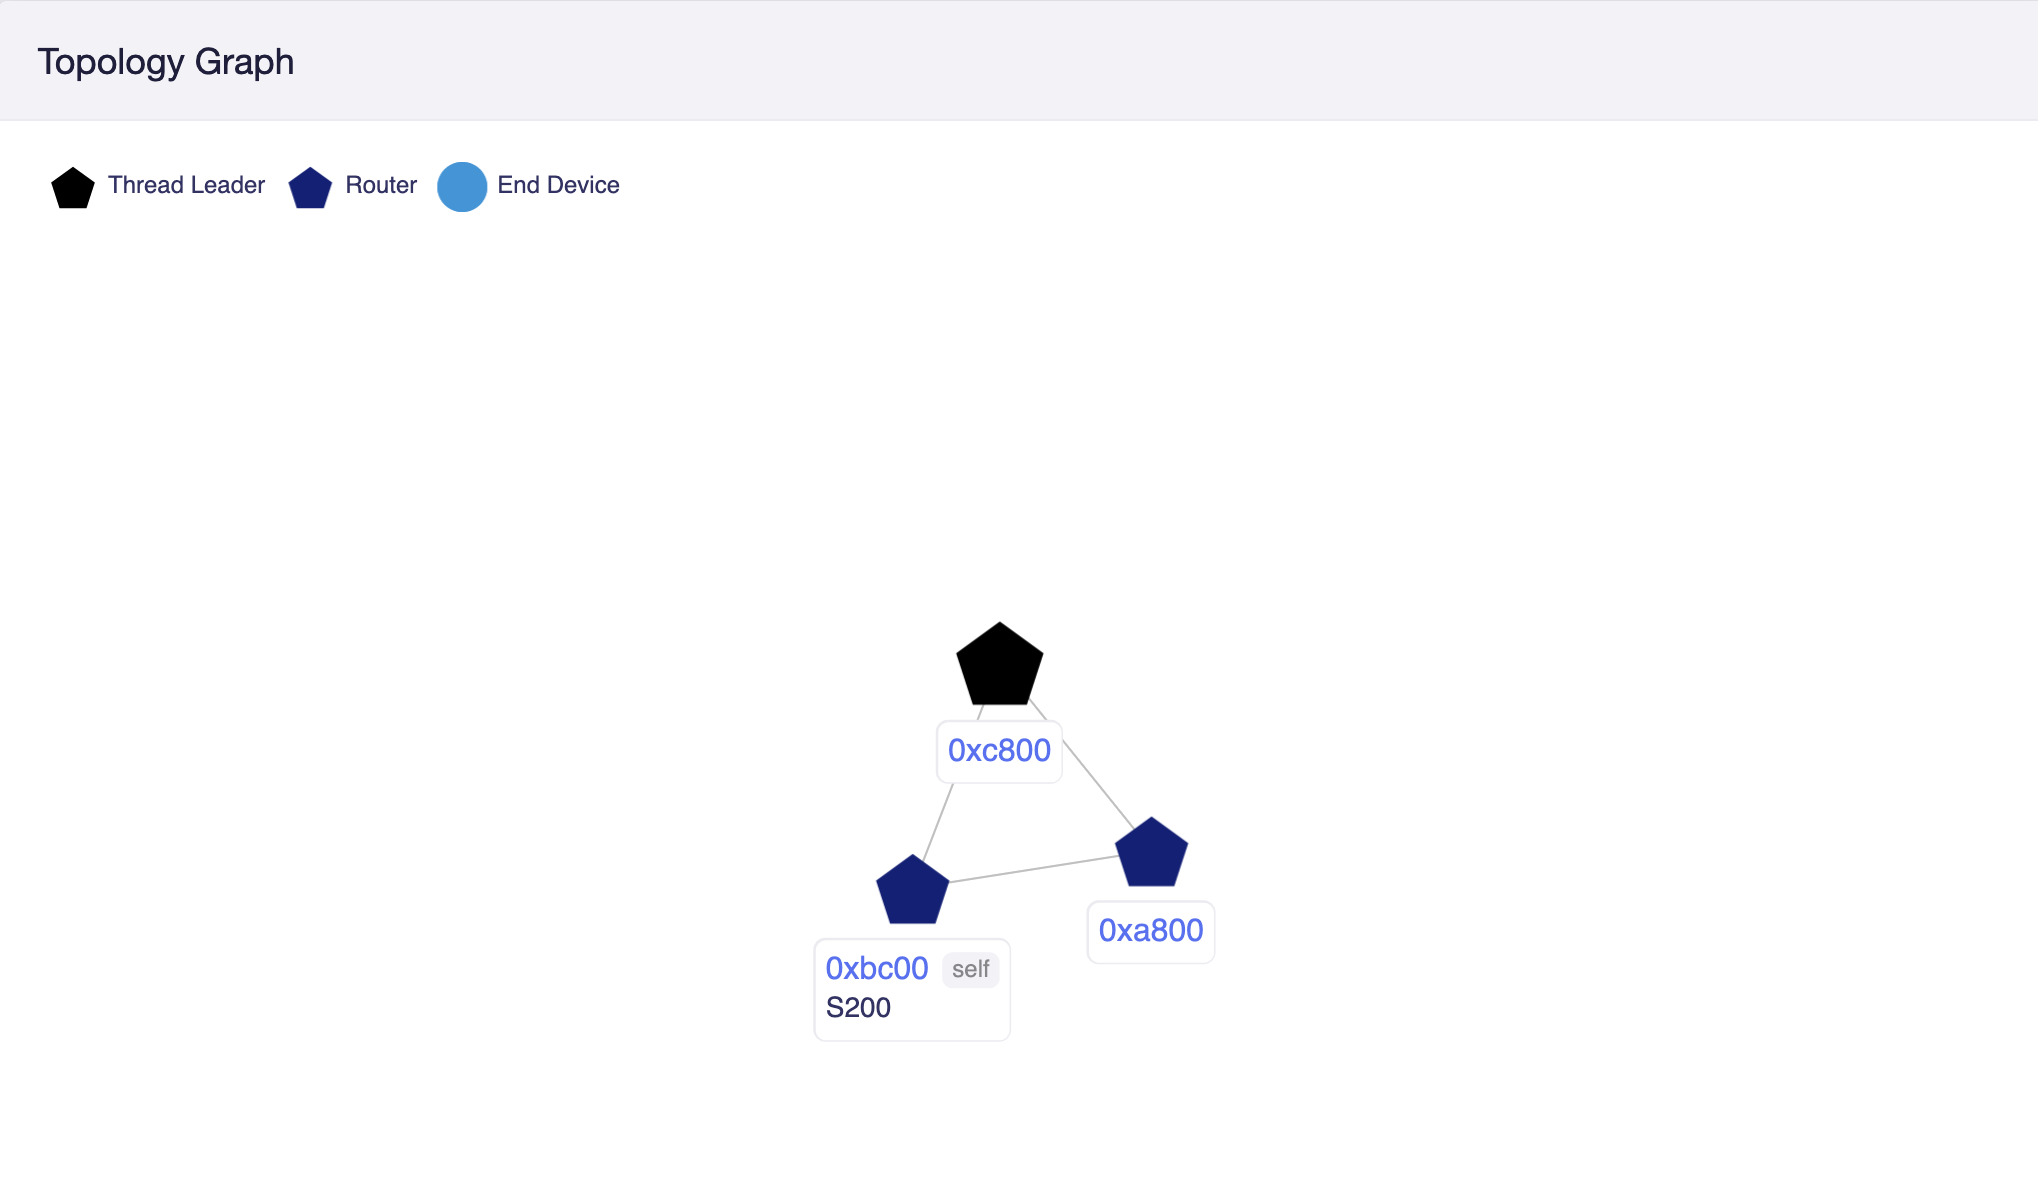
You should see it report as child or router. You can also check the Thread Topologies tab in the web Admin Panel of the GL-S200 Border Router to see the
Topology Graph. The network topology data is obtained by sending multicast
packets. The network topology data allows you to view information about each
node such as the IPv6 address, mode of operation, directly connected sub-nodes, etc.
After the node has successfully connected to the Thread network, it has access to the internet! You should be able to ping Google DNS IPv4 address from the node which will synthesize the IPv6 address based on the NAT64 prefix got from the Broder Router.
uart:~$ ot ping 8.8.8.8
Verify the Device Connection
Once the device has rebooted, the firmware should automatically connect to the Golioth Cloud.
Once the device has connected, you should see the device "Connection Status" change to "online".
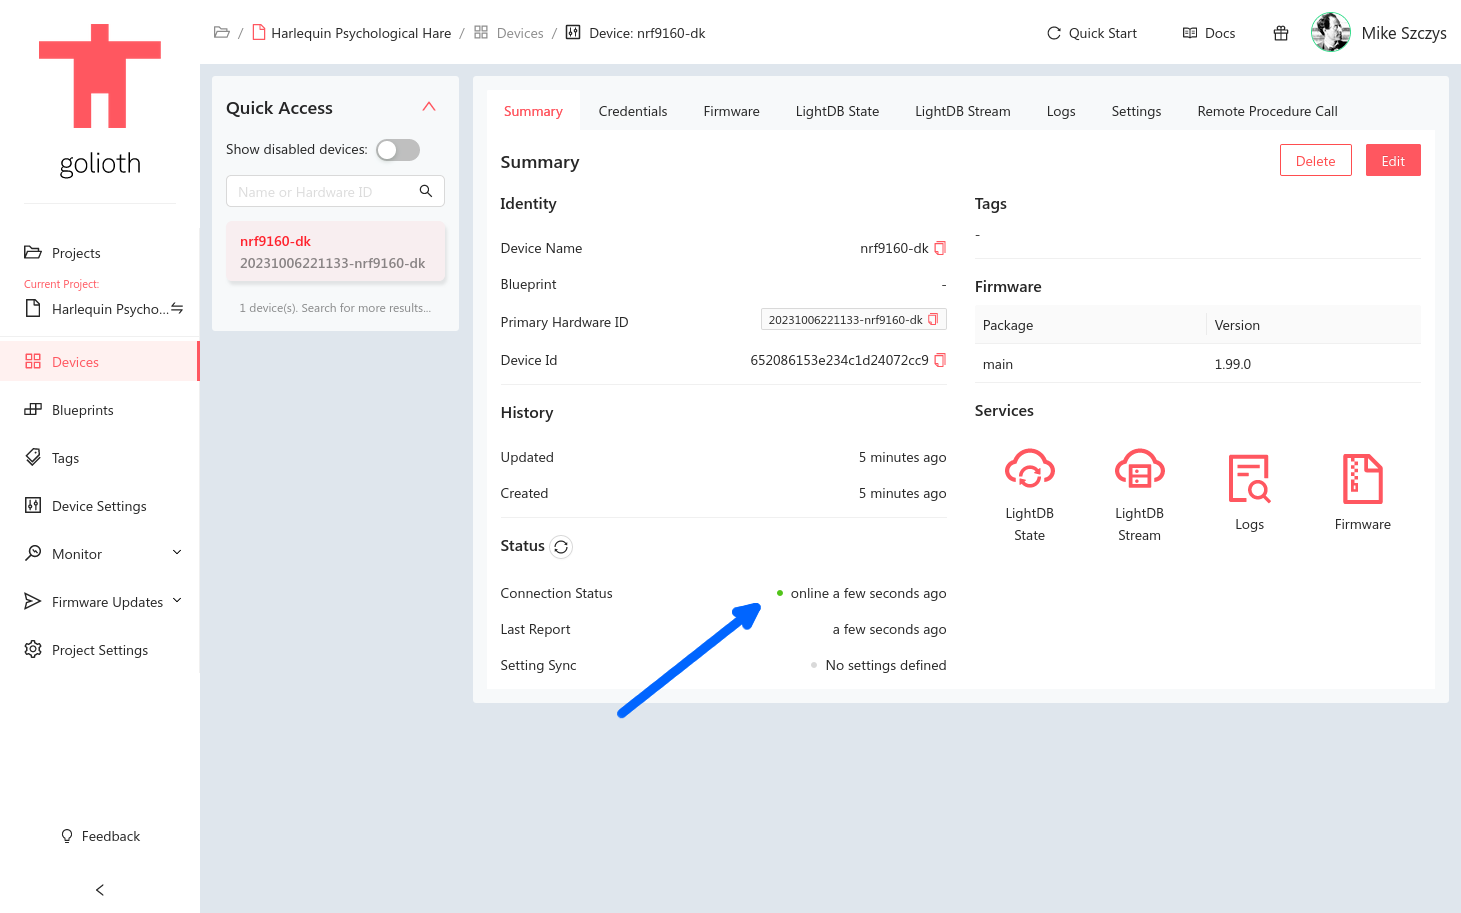
If you click on the device's "LightDB Stream" tab, you should see data streaming in from the device.

Congratulations, you have successfully connected your follow-along hardware to the Golioth Cloud!
Next Steps
Interact using the Golioth Console
Now that your device is connected to the Golioth Cloud, you can explore the other Golioth features used by the OpenThread Demo. Information for working with OTA Firmware Updates, Device Settings, RPCs, Logs, and example output for time-series Stream data and LightDB State data are available in the Golioth Features section of the firmware repository.
Some ideas:
- Check out the "Logs" tab to see real-time log messages streaming from the device.
- Click the "LightDB Stream" tab and use the refresh button in the upper right to see time-series data arriving to the cloud from your device.
- Navigate to the "Remote Procedure Call" tab and call the
get_network_infomethod to query and return detailed information about the device's network connection.
Compile a custom firmware image
The source code for the pre-built firmware image can be customized for your specific application. For detailed instructions on how to build the reference design firmware used in this guide, see the README in the firmware GitHub repo.
If you're brand new to building firmware with Zephyr, we provide free online developer training.